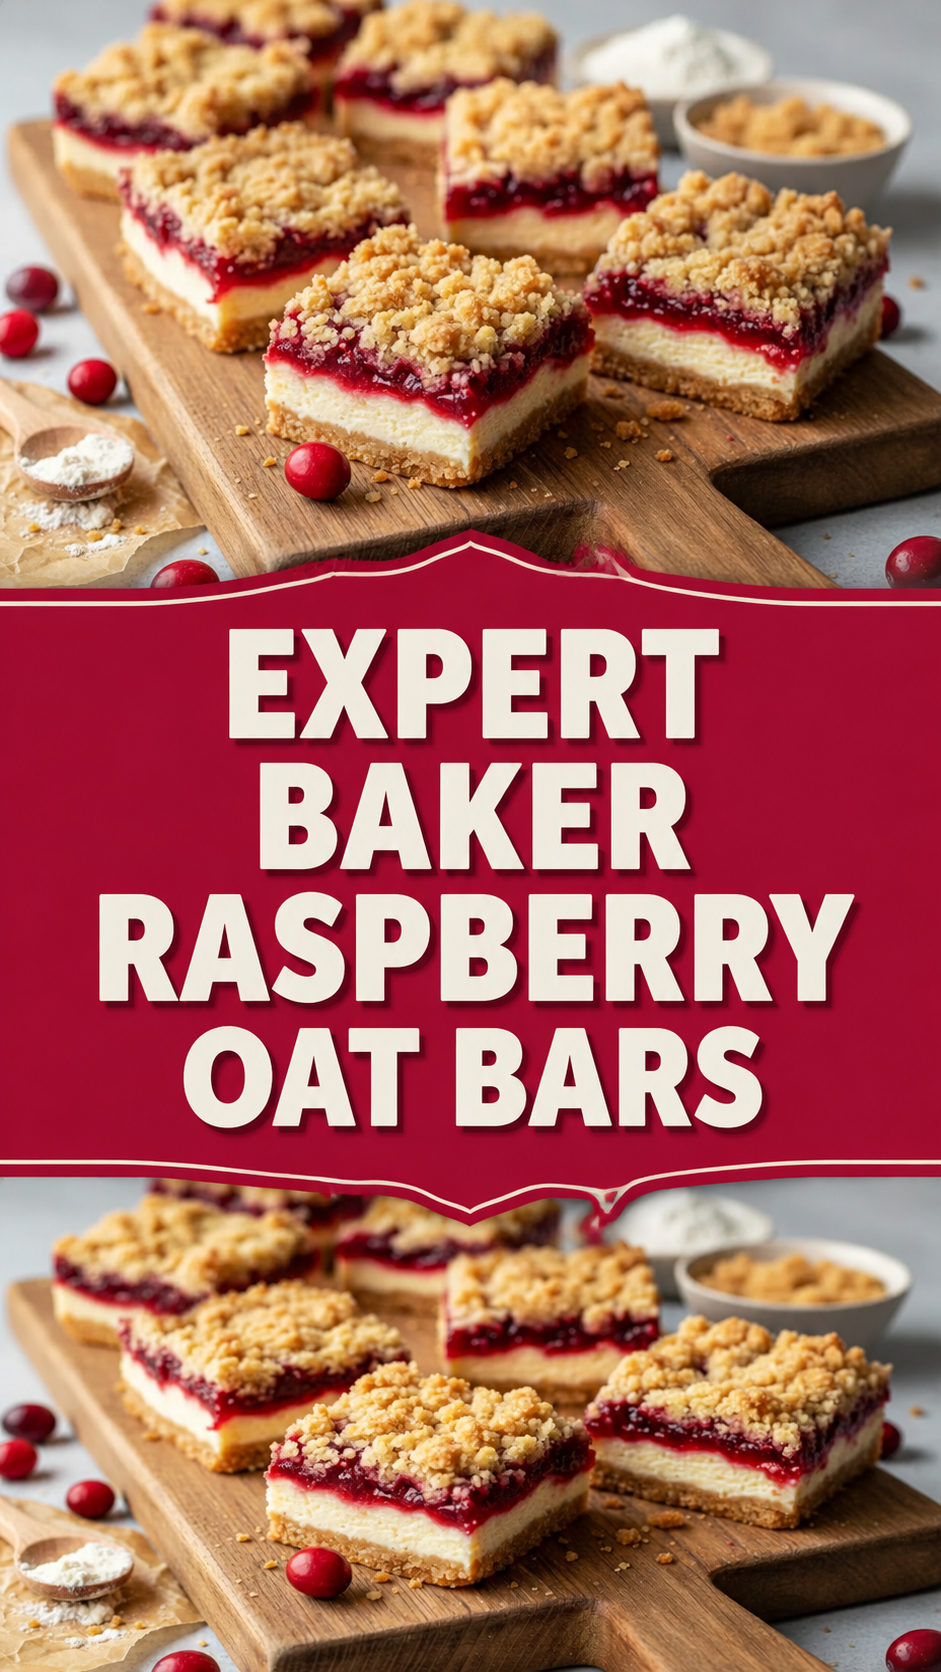
My Very First Raspberry Oat Bars
I still laugh when I think about the first time I made these bars. I was in my little kitchen, and the jam bubbled right over the edges. My whole stove looked like a raspberry crime scene.
But you know what? They tasted fantastic. That sticky mess taught me that even mistakes can turn out delicious. Have you ever had a baking disaster that ended up being your favorite recipe?
A Little History in Every Bite
Oat bars have been around longer than most of us remember. They started as simple, hearty snacks for farmers and kids who needed energy to run and play.
*Fun fact*: Oats were once called a weed by ancient farmers. People only grew them for animal feed until they realized how tasty and filling oats are for people too.
That matters because these bars are more than a treat. They give you slow-burning energy to get through your afternoon. No sugar crash here, just happy tummies.
The Secret to a Perfect Crust
Creaming butter and sugar together might sound fancy, but it is just a happy dance. When I was a little girl, my grandma called it “making clouds in a bowl.”
Why does that step matter? Because those tiny air pockets make the crust tender instead of tough. If you skip it, you get a brick. Nobody wants a brick bar.
Do you like your crust thick and chewy or thin and crisp? I go for thick every time – more room for jam.
Raspberry Filling That Pops
Store-bought jam works beautifully. But I always add a squeeze of fresh lemon juice. That little sour note wakes up the sweetness and makes the berries taste sunnier.
I remember my neighbor Mrs. Garcia using her homemade blackberry jam instead. She said the lemon juice kept the filling from being too sticky. She was right.
Do you prefer seedless jam or like a little crunch from the seeds? I am team seedless – I want the oats to do the crunching.
Building and Baking with Love
When you press the crust into the pan, use your fingers. It feels nice and helps you make an even layer. I once used a spoon and ended up with a lopsided bar.
Sprinkle the topping gently over the jam. Do not smash it down too hard. Let it sit lightly, so the jam can bubble up and make pretty golden spots.
Why does baking time matter? Underbaked bars fall apart. Overbaked bars get dry. Watch for golden edges and bubbly jam – that is your signal.
Waiting Is the Hardest Part
I know you want to cut into these bars the second they come out of the oven. I have done that. The jam oozed everywhere, and the crust crumbled into a pile of crumbs.
Let them cool completely. Walk away. Go read a book or call a friend. When they are fully cool, they cut into neat squares that hold together.
That patience matters because these bars make great lunchbox surprises. They also freeze beautifully – just wrap them up and pull one out whenever you need a little sweetness.
What is your favorite way to eat an oat bar? With a glass of milk, crumbled over yogurt, or straight out of the pan like I sometimes do? I would love to hear your stories.
Instructions
Step 1: Preheat your oven to 350 degrees. Line a 9×13 pan with parchment paper. Let a little hang over the sides for easy lifting. (I always forget the overhang – makes cutting so much easier!)
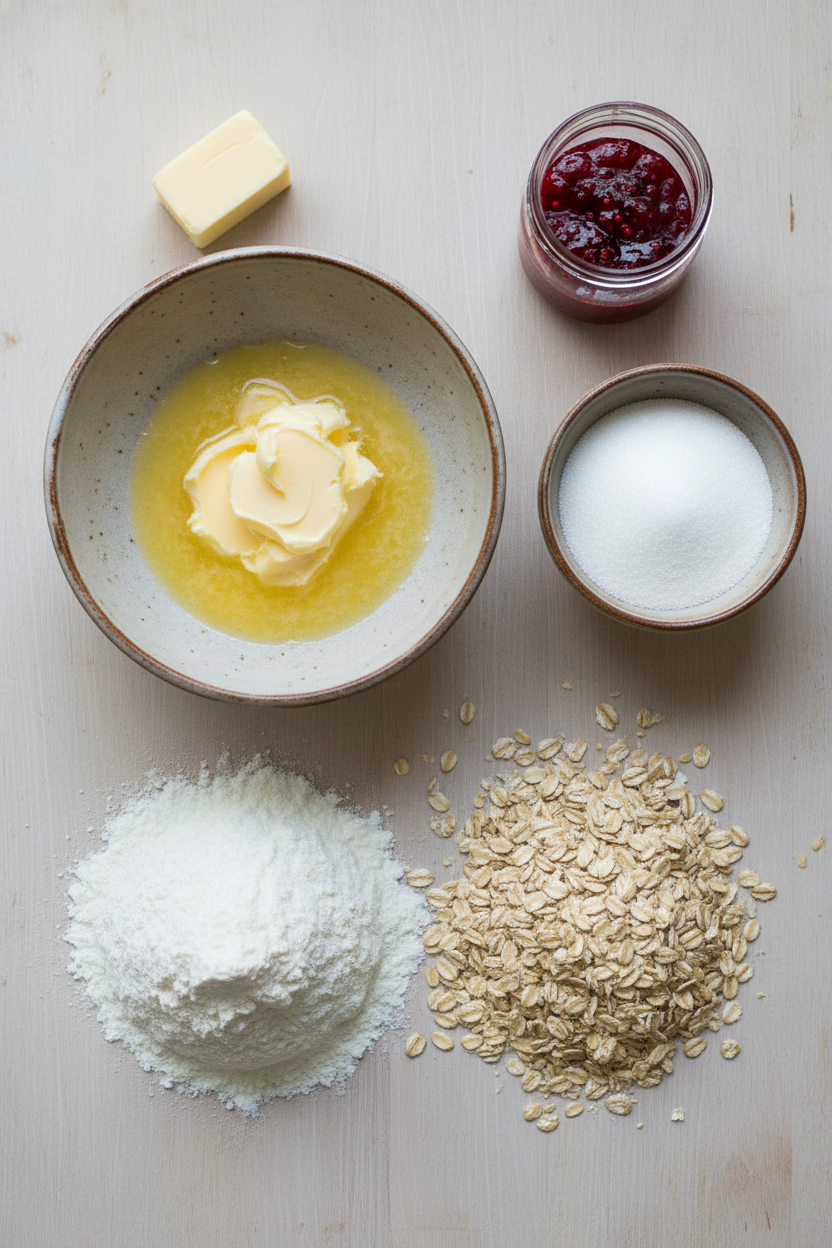
Step 2: In a big bowl, beat the butter with white and brown sugar. Keep going until it looks light and fluffy, about two minutes. Stir in a teaspoon of vanilla. My grandma used to let me lick the spoon – I still smile at that.
Step 3: In another bowl, whisk flour, baking powder, and salt. Add this to the butter mix and stir until crumbly. Then fold in the oats gently. Does your dough hold together when you pinch it? … Share below!
Step 4: Press two-thirds of the mixture into the pan. Use your fingers – it’s the best way. In a small bowl, stir raspberry jam with a little lemon juice. Spread it right to the edges.
Step 5: Sprinkle the rest of the oat mixture on top. Press down lightly so it sticks to the jam. Bake for 30–35 minutes until golden and bubbly. Doesn’t that smell amazing?
Step 6: Let the bars cool completely in the pan. That’s the hardest part! Lift them out using the parchment. Cut into squares. You earned this treat.
Creative Twists
Try these fun changes. They are simple and delicious.
… Swap the jam for blackberry or apricot. Each gives a different sweet-tart pop.
… Add a handful of white chocolate chips to the crumb topping. Melty and lovely.
… Sprinkle a few sliced almonds on top before baking. Extra crunch!
Which one would you try first? Comment below!
Serving & Pairing Ideas
These bars are perfect on their own. But a scoop of vanilla ice cream on the side feels like a hug. You can also dust them with powdered sugar for a pretty look. For breakfast, crumble one over yogurt. That is my secret trick. Which would you choose tonight?
Storing Your Raspberry Oat Bars
These bars keep beautifully in the fridge for up to a week. First, let them cool completely on the counter. Then wrap them tightly in plastic wrap or foil. I remember my first batch – I tossed them in a tin without wrapping. They got hard and dry the next day.
For the freezer, cut the bars into squares first. Stack them with a piece of wax paper between each layer. Place the stack in a freezer-safe bag or container. They will stay fresh for three months. When you want one, just thaw it on the counter for about 30 minutes.
To reheat, pop a bar in the microwave for 10 seconds. This brings back that warm, soft texture. Batch cooking a double recipe saves you time for busy mornings or last-minute guests. Storing them well means you always have a homemade treat ready. Have you ever tried storing it this way? Share below!
Common Problems and Easy Fixes
Problem one: the crust is too crumbly. This happens when you don’t press it firmly enough. Use the back of a spoon or your fingers to really pack it down. I once had a crust that fell apart when I cut the bars. A firmer press fixed it perfectly.
Problem two: the jam bubbles out during baking. That means you spread the filling too close to the edge. Leave a tiny border around the crust. The jam will stay inside and not burn on the pan. Getting this right makes the bars look pretty and taste clean.
Problem three: the top is raw in the middle. Your oven might run cool, or you cut the bars too soon. Let them cool fully in the pan – about two hours. *Fun fact: these bars actually taste better the next day as the flavors settle.* Fixing these small issues makes you a more confident baker. Which of these problems have you run into before?
Your Quick Questions
Can I use quick oats instead of rolled oats?
Quick oats are cut smaller than rolled oats, so they soak up moisture faster. This can make the crust denser and less crunchy. For the best crumbly texture, stick with old-fashioned rolled oats. They keep their shape during baking and give that nice, chewy bite. If you only have quick oats, expect a softer bar that may not hold together as well. The oats are a key part of the crust and topping, so don’t swap them unless you are okay with a different result.
Can I use a different jam flavor?
Absolutely – strawberry, apricot, or blackberry work great. Just pick a jam that is not too runny. A thick, seedless jam spreads evenly and won’t soak into the crust. The lemon juice brightens any fruit flavor, so don’t skip it. I once tried a very watery jam and the bars turned mushy. For a firmer filling, you can cook the jam with a little cornstarch first. But most store-bought jams are thick enough as is. Feel free to get creative, as long as the jam is on the thick side.
How do I make this recipe gluten-free?
Swap the all-purpose flour for a 1-to-1 gluten-free baking flour blend. Make sure it contains xanthan gum to help with structure. The oats must be certified gluten-free, because regular oats can be cross-contaminated. The butter, sugar, and jam are naturally gluten-free, so only the flour and oats need changing. The texture will be slightly more tender, but still delicious. Press the crust extra firmly because gluten-free dough can be a bit more fragile. Bake until the top looks golden brown – the time stays about the same.
Warm Wishes from Lily
I hope these tips help you bake the raspberry oat bars with confidence. They are one of my favorite treats to share with family and friends. The sweet jam, buttery crust, and crunchy oats make every bite special. Have you tried this recipe? I would love to hear how yours turned out. Drop a comment below and tell me your favorite twist or memory with these bars. Happy cooking! —Lily Simmer

Expert Baker Raspberry Oat Bars
Description
Delicious raspberry oat bars with a crumbly crust and sweet raspberry filling.
Ingredients
For the Crust:
For the Filling:
Instructions
- Preheat your oven to 350 degrees Fahrenheit. Line a 9×13 inch baking pan with parchment paper, leaving an overhang on two sides.
- In a large mixing bowl, blend the softened unsalted butter with both the granulated and brown sugars. Beat until the mixture is light, fluffy, about 2 to 3 minutes. Stir in the vanilla extract.
- In a separate bowl, whisk together the all-purpose flour, baking powder, and salt.
- Add the dry ingredients to the butter-sugar mixture and mix until it is crumbly with small, moist clumps. Then, gently stir in the old-fashioned rolled oats until just incorporated.
- Press about two-thirds of the crumbly oat mixture evenly into the bottom of the prepared pan. Use a flat spatula or your fingers to form an even layer.
- In a small bowl, stir together the raspberry jam and fresh lemon juice. Spread this mixture across the crust, reaching as close to the edges as possible.
- Sprinkle the remaining oat mixture evenly over the raspberry layer. Gently press down so the topping clings to the jam.
- Bake your assembled bars for 30 to 35 minutes, until the top is golden and the jam bubbles at the edges. Remove from the oven and let the bars cool completely in the pan before lifting them out and cutting into squares.
Prepare Your Pan and Oven
Cream the Butter and Sugars
Mix the Dry Ingredients
Combine and Add Oats
Build the Crust
Make the Raspberry Filling
Add the Crumb Topping
Bake and Cool
Notes
- Full Nutrition:
Serving Size: 1 bar
Calories: 250
Sugar: 20g
Sodium: 60mg
Fat: 10g
Saturated Fat: 6g
Unsaturated Fat: 3g
Trans Fat: 0g
Carbohydrates: 37g
Fiber: 1g
Protein: 2g
Cholesterol: 25mg
Notes: For best results, chill dough before pressing into pan. Use cold butter for a flakier crust. Gently fold raspberries to avoid crushing. If using frozen berries, do not thaw. Line pan with parchment for easy removal. Let bars cool completely before slicing to prevent crumbling. Store in an airtight container.