My First Caramel Surprise
The first time I made caramel, I got scared. The sugar bubbled and I almost called my grandma. But I stayed calm, and it turned into liquid gold. That day I learned something important.
This no-bake cheesecake cup recipe brings back that memory. It starts with caramel, but you can buy a good thick one if you want. Just don’t tell my grandma. Have you ever made caramel at home? I’d love to hear your story.
Why That Caramel Matters
When you make caramel yourself, you control the salt and sweetness. That small act of patience changes everything. The flavor is deeper, and it feels like a hug in a jar.
*Fun fact: Caramel gets its color from heating sugar without burning it. The golden brown is a happy accident of chemistry.*
If you use store-bought, warm it a little first. That makes it pour like a smooth river. Does your family have a favorite caramel brand? Tell me in the comments.
The Crust That Holds Everything
Graham crackers remind me of camping with my kids. We would make s’mores and laugh until bedtime. Now I crush them for this crust.
You mix crumbs with melted butter until it looks like wet sand. Then press it down firmly. A firm press keeps the crust from falling apart when you take a bite. Why does that matter? Because every layer deserves a strong foundation.
A Smooth Filling Takes Time
Soft cream cheese is the secret. If it is cold, it fights you and turns lumpy. Let it sit on the counter for thirty minutes before you start. Then beat it with sugar until it is creamy and happy.
You also whip cold cream until it forms soft peaks. That means the cream lifts up and droops a little. Then you fold it gently into the cream cheese mixture. Folding keeps the filling light and airy, like a cloud. This is why your cheesecake will feel silky, not heavy.
Patience Pays Off in the Fridge
I still laugh at myself when I try to rush things. One time I served these cups after only two hours. They were runny and sad. The next time, I waited overnight. What a difference.
Chilling for at least four hours lets everything set. The crust stays crisp, the filling gets firm, and the layers stay clean. If you can wait until the next day, do it. Your taste buds will thank you. What is the longest you have waited for a dessert?
The Salt That Makes It Sing
Right before you serve, drizzle the caramel on top and add a pinch of flaky sea salt. The salt wakes up the sweetness. It is a tiny sprinkle that makes your mouth smile.
You can also add toasted nuts for crunch. I like pecans or almonds. This last step is why the cups feel fancy without any work. Doesn’t that smell amazing? Well, it will when you open the fridge. I hope you try these and tell me how they turn out. What topping would you add to yours?
Instructions
Step 1: Set up six small jars or cups. Clear ones let you see the pretty layers. Place them on a tray so they are easy to move. Make sure your cream cheese is soft and your heavy cream is cold. (This step saves you from lumpy filling later.)
Step 2: Make the caramel sauce first. Warm the heavy cream until it feels just warm. In a pan, stir sugar and water, then cook until deep amber. Do not walk away — it changes fast. Pour in the warm cream carefully and whisk until smooth. Add butter, whisk, then cool completely. What is your favorite caramel tip? Share below!
Step 3: Stir graham cracker crumbs with melted butter until it looks like wet sand. Spoon into each cup and press down firmly. A good press helps the crust stay together when you dig in. Pop the cups in the fridge while you make the filling.
Step 4: Whip the cold heavy cream in a cold bowl until soft peaks form. Soft peaks mean the cream holds a little curl when you lift the whisk. Stop there — we want light and airy, not stiff. This makes the cheesecake filling fluffy without baking.
Step 5: Beat the soft cream cheese and sugar until smooth and creamy. Take your time — no lumps allowed. Add two tablespoons of cooled caramel and mix until even. If your cream cheese fights you, it was not soft enough. Patience pays off here.
Step 6: Fold the whipped cream into the cream cheese mixture in two parts. Use a spatula and gentle scooping motions. Folding keeps the filling light, like a soft cloud. Overmixing makes it runny, so stop once it looks smooth and fluffy.
Step 7: Spoon the cheesecake filling over the chilled crusts. Fill each cup about three-quarters full. Smooth the tops with a small spatula for a neat finish. Little touches make them look like bakery sweets.
Step 8: Cover the cups and chill for at least 4 hours. Overnight is even better for clean layers and a firm texture. Do not rush this step — the fridge does the magic. I still laugh at the time I tried to serve them early and they slid around.
Step 9: Drizzle the remaining caramel over each cup. If it is too thick, warm it for a few seconds. Sprinkle a pinch of flaky sea salt on top. Add chopped nuts if you want crunch. Serve cold, straight from the fridge. Doesn’t that smell amazing?
Creative Twists
… Swap the graham cracker crust for crushed chocolate wafer cookies. It adds a deep, cocoa twist that kids love.
… Stir a little espresso powder into the cheesecake filling. It makes the caramel taste even richer and more grown-up.
… Layer fresh sliced bananas on top of the crust before adding the filling. Salted caramel and banana are best friends, I promise.
Which one would you try first? Comment below!
Serving & Pairing Ideas
Serve these cups as a make-ahead dessert for dinner parties. They look fancy with a tiny mint leaf on top. Pair them with a cup of hot black tea or a tall glass of cold milk. For extra fun, set out a bowl of extra caramel and sea salt so everyone can add their own. Which would you choose tonight?

Storing and Reheating Your Cheesecake Cups
These cups love the fridge. Cover them tightly with plastic wrap or a lid. They stay fresh for up to four days. I once forgot a batch in the back of the fridge and found them three days later. They tasted even better because the flavors had time to mingle. The caramel sinks into the cheesecake just a little, making every bite perfect. Batch cooking is a lifesaver here. Make six cups on Sunday and enjoy them all week. You can freeze the cups without the caramel topping. Just wrap each cup in plastic wrap and pop them in a freezer bag. They keep for two months. To thaw, move a cup to the fridge overnight. Then add the caramel and salt right before serving. Do not microwave the cups. The cream cheese will separate and turn grainy. Instead, let them sit at room temperature for ten minutes if you want a softer bite. Storing ahead means you always have a sweet treat ready for guests or a tough day. That matters because home cooking should save time, not steal it. Have you ever tried storing it this way? Share below!
Three Common Problems and Simple Fixes
First, the caramel can turn grainy or hard. This happens when sugar crystals form. To fix it, always use a clean pan and stir gently only until the sugar dissolves. I remember my first caramel turned into a rock. I had to start over. Lesson learned. Second, the graham cracker crust can crumble when you try to eat it. The fix is simple: press the crust down very firmly. Use the back of a spoon and push hard. A tight crust holds everything together. Third, the cheesecake filling can come out too runny. This usually means the cream cheese was not soft enough or the whipped cream was overmixed. Make sure your cream cheese is at room temperature. Whip the cream just until soft peaks form, then stop. Why does fixing these issues matter? Because a smooth filling and stable crust make you feel proud of what you made. And when the flavor is just right, you want to share it with everyone. Confidence in the kitchen grows one small win at a time. Which of these problems have you run into before?
Your Quick Questions
Can I use low‑fat cream cheese?
I do not suggest it. Full‑fat cream cheese gives the filling its rich, creamy body. Low‑fat versions have more water, which makes the cheesecake turn runny and loose. The cups will still taste okay, but the texture will be thin and less satisfying. You also lose that luxurious mouthfeel that makes these cups feel like a real dessert. Stick with the full‑fat block, not the spreadable kind in a tub. The block has a firmer texture that whips up beautifully. If you really must cut calories, try using only half the amount of cream cheese and adding a little extra whipped cream. But the best result comes from using what the recipe says. Which tip will you try first?
My caramel sauce turned out too dark and bitter. What do I do?
That means the sugar cooked a little too long. Color changes fast near the end, so always watch closely. If it already tastes bitter, you cannot fix it completely. But you can balance the bitterness by adding a pinch more salt and a splash of vanilla extract. Stir in a small spoonful of honey or maple syrup to add sweetness. The bitterness will soften, and the salt will help your tongue ignore the burnt notes. Next time, pull the pan off the heat as soon as the caramel turns a deep amber, not dark brown. I use a light‑colored pan so I can see the color shift. Practice makes perfect, so do not toss it right away. Which tip will you try first?
How do I get clean, tidy layers in the cups?
Patience is the main ingredient here. First, press the graham crust flat and even. Next, pipe the cheesecake filling using a piping bag or a zip‑top bag with a corner snipped off. That gives you control and keeps the filling off the glass walls. Fill each cup only three‑quarters full. Then tap the tray gently on the counter to settle the layers. Refrigerate the cups for at least four hours, but overnight is best. The long chill lets the layers firm up so they do not mix when you add the caramel. When you spoon the caramel on top, use a clean spoon and drizzle slowly in the center. Gravity will spread it evenly. The layers will stay sharp and beautiful. Which tip will you try first?
A Warm Goodbye from Lily
I hope you feel ready to make these little cups. They are perfect for a quiet night or a party. Every time I make them, someone asks for the recipe. That always makes me smile. Remember, the caramel gets better as it sits, so do not rush. Cooking is about joy, not perfection. If a layer slips, just call it rustic. Have you tried this recipe? Let me know in the comments. I would love to hear how your cups turned out. Happy cooking! —Lily Simmer.

No Bake Salted Caramel Cheesecake Cups
Description
Rich and creamy no-bake salted caramel cheesecake cups with a graham cracker crust and homemade caramel topping.
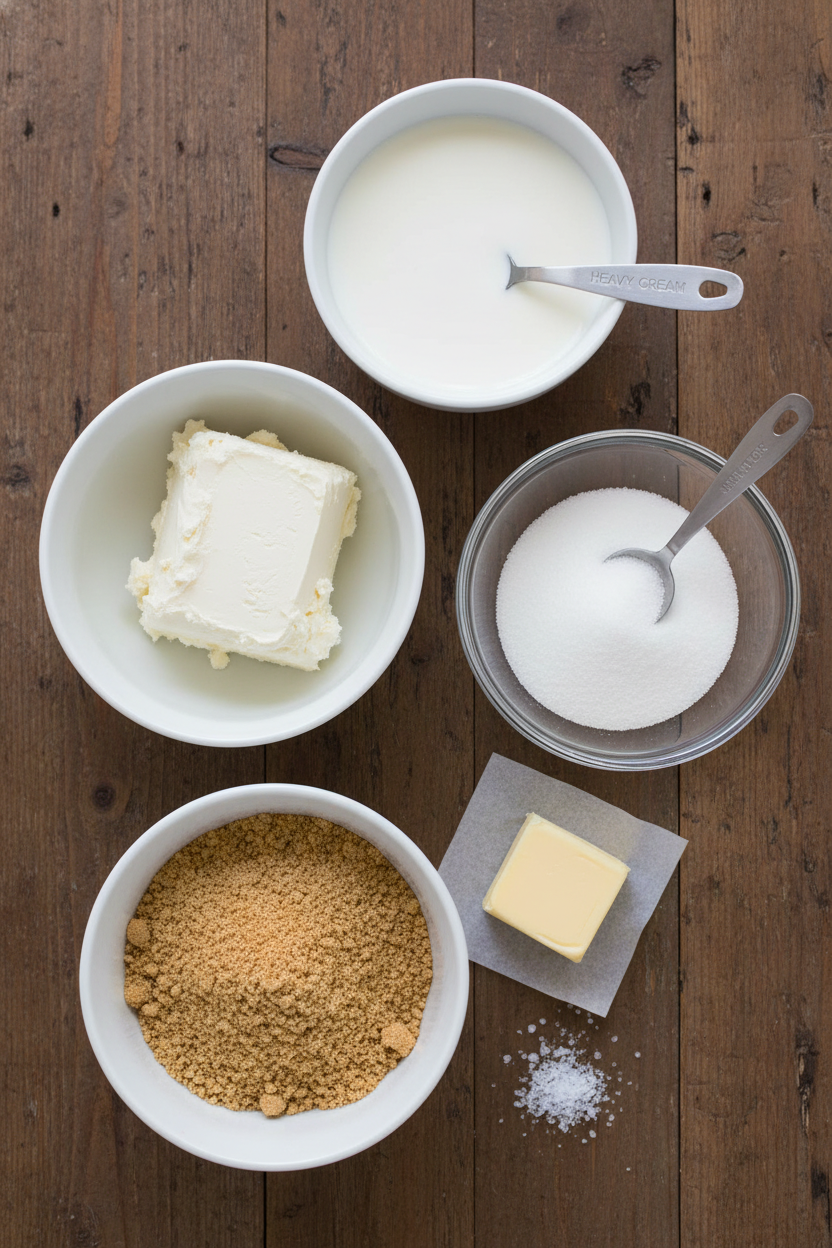
Ingredients
Caramel sauce (make ahead)
Graham cracker crust
Cheesecake filling
Topping and garnish
Instructions
- Pick 6 small jars or dessert cups. Clear cups look great because you can see the layers, but any small cups work well. Place them on a tray so you can move them into the fridge easily.
- Now focus on temperature: the cream cheese should be soft, the heavy cream for whipping should be cold, and the caramel should be cooled before it touches the filling.
- If you want the best flavor, make the caramel at home. Warm the heavy cream until it is warm to the touch, not boiling.
- In a medium saucepan, add the sugar and water. Let it dissolve, then cook over medium heat until it turns a deep amber color. Do not walk away, because the color changes fast near the end.
- Carefully pour in the warm cream while whisking. It will bubble up strongly, so use a deeper pan and keep your face back. Once it calms down, whisk until smooth, then whisk in the softened butter until the sauce looks glossy.
- Let it cool fully, then chill it until it thickens.
- If you want a faster option, you can use a good store-bought caramel sauce. Choose one that is thick, not watery, so it sits nicely on top of the cups.
- Stir the graham cracker crumbs and melted butter in a bowl until the crumbs look like wet sand.
- Spoon the mixture into your cups and press it down firmly with the back of a spoon. A firm press helps the crust hold its shape when you eat.
- Place the cups in the fridge while you make the filling so the base can chill and set.
- Pour the cold heavy cream into a cold bowl. Whip until you reach soft peaks. Soft peaks mean the cream lifts, then gently bends over instead of standing straight. Stop there for now. This step gives the cheesecake its airy texture without baking.
- In a separate bowl, beat the softened cream cheese and sugar until creamy and lump-free. Take your time here. A smooth base is what makes the final cups taste professional.
- Add 2 tablespoons of cooled caramel sauce and mix again until the color looks even.
- If your cream cheese is not soft enough, it will fight you and turn lumpy, so make sure it is properly softened before you start mixing.
- Now add the whipped cream to the cream cheese mixture in two parts. Fold it in with a spatula using gentle turns. Folding means you scoop from the bottom and lift up and over, instead of stirring hard.
- This keeps the filling light and helps it set with a soft, creamy bite. Once it looks smooth and fluffy, stop. Overmixing can make the filling loose.
- Spoon or pipe the cheesecake filling on top of the chilled crusts. Fill each cup about three-quarters full so you still have space for caramel on top.
- Smooth the surface with a spoon or small spatula. Little details like this make the cups look clean and bakery-ready.
- Cover the cups and chill in the fridge for at least 4 hours. Overnight is even better if you want the cleanest layers and the best texture. This chill time is what firms everything up, so do not rush it.
- When you are ready to serve, spoon or drizzle caramel over each cup.
- If your caramel is too thick, warm it for a few seconds so it pours easily, then let it cool slightly before adding it on top.
- Finish with a small pinch of flaky sea salt. Add chopped toasted nuts if you want crunch. Serve cold, straight from the fridge.
Step 1: Set up your cups and ingredients
Step 2: Make the caramel sauce (or use a shortcut)
Step 3: Make the graham cracker crust
Step 4: Whip the cream for a light, stable filling
Step 5: Mix the cheesecake base until completely smooth
Step 6: Fold in the whipped cream gently
Step 7: Assemble the cups neatly
Step 8: Chill until fully set
Step 9: Add the salted caramel topping and finish
Notes
- Chill cheesecake at least 4 hours, ideally overnight.
- Use room-temperature cream cheese for smooth texture.
- For vegan option, use coconut cream and dairy-free cream cheese.
- Let caramel cool slightly before layering to avoid melting.
- Add flaky salt just before serving.
- Use silicone cups or liners for easy removal.