Why I Love a Swiss Roll
I remember the first time I made a Swiss roll. It was for my son’s birthday party. He loved chocolate and peanut butter more than anything.
The cake looked like a big, curly log when I rolled it. Everyone laughed when I said it was a magic trick. Does your family have a favorite rolled dessert?
The Secret to a Light Sponge
Here is a little trick I learned from my mother. You have to beat the eggs and sugar until they are thick and pale. It takes about four or five minutes. This step is not a race.
Think of it like blowing up a balloon. The more air you get in there, the fluffier the cake will be. I still laugh at the time I stopped too early and the cake came out flat as a pancake. *Fun fact: Beating eggs and sugar this way is called the “foaming method.” It makes the cake rise without any extra baking soda or powder needed inside the eggs themselves.*
Why does this matter? A light sponge is the whole reason a Swiss roll can bend without cracking. If the cake is heavy, it will break when you try to roll it up. Have you ever had a cake crack on you?
Rolling While Hot – Why It Works
When the cake comes out of the oven, you have to act fast. Flip it onto a clean towel dusted with powdered sugar. Then peel off the parchment paper and roll the cake up inside the towel.
This step always makes me feel like a busy chef. But it is simple. The warmth helps the cake remember its shape. By the time it cools, it holds a gentle curve. That means when you fill it later, it won’t fight you. Doesn’t that smell amazing? The warm chocolate and sugar mix together.
Why this matters: If you let the cake cool flat, it will snap when you try to curl it. Rolling it warm teaches the cake how to bend. I have learned that lesson the hard way more than once.
Peanut Butter Filling – Creamy and Joyful
The filling is my favorite part. You beat peanut butter with a little powdered sugar, then add heavy cream and vanilla. It turns into a light, spreadable cloud. Then you fold in chopped peanut butter cups. My grandson always steals a handful of those before they go into the bowl.
Spread the filling evenly, but leave a small border around the edges. That keeps it from oozing out when you roll. Do you like extra filling inside or more on top?
The Ganache That Makes It Fancy
The chocolate ganache on top is optional, but I say go for it. You just heat cream until it steams, pour it over chocolate chips, and stir. It turns into a shiny, smooth glaze. Drizzle it over the rolled cake and let it set.
Once, I dripped ganache all over the counter and my dog licked it up before I could clean. He had a chocolate mustache. Now I always put a towel down. Have you ever had a kitchen mess turn into a funny memory?
Slicing and Sharing
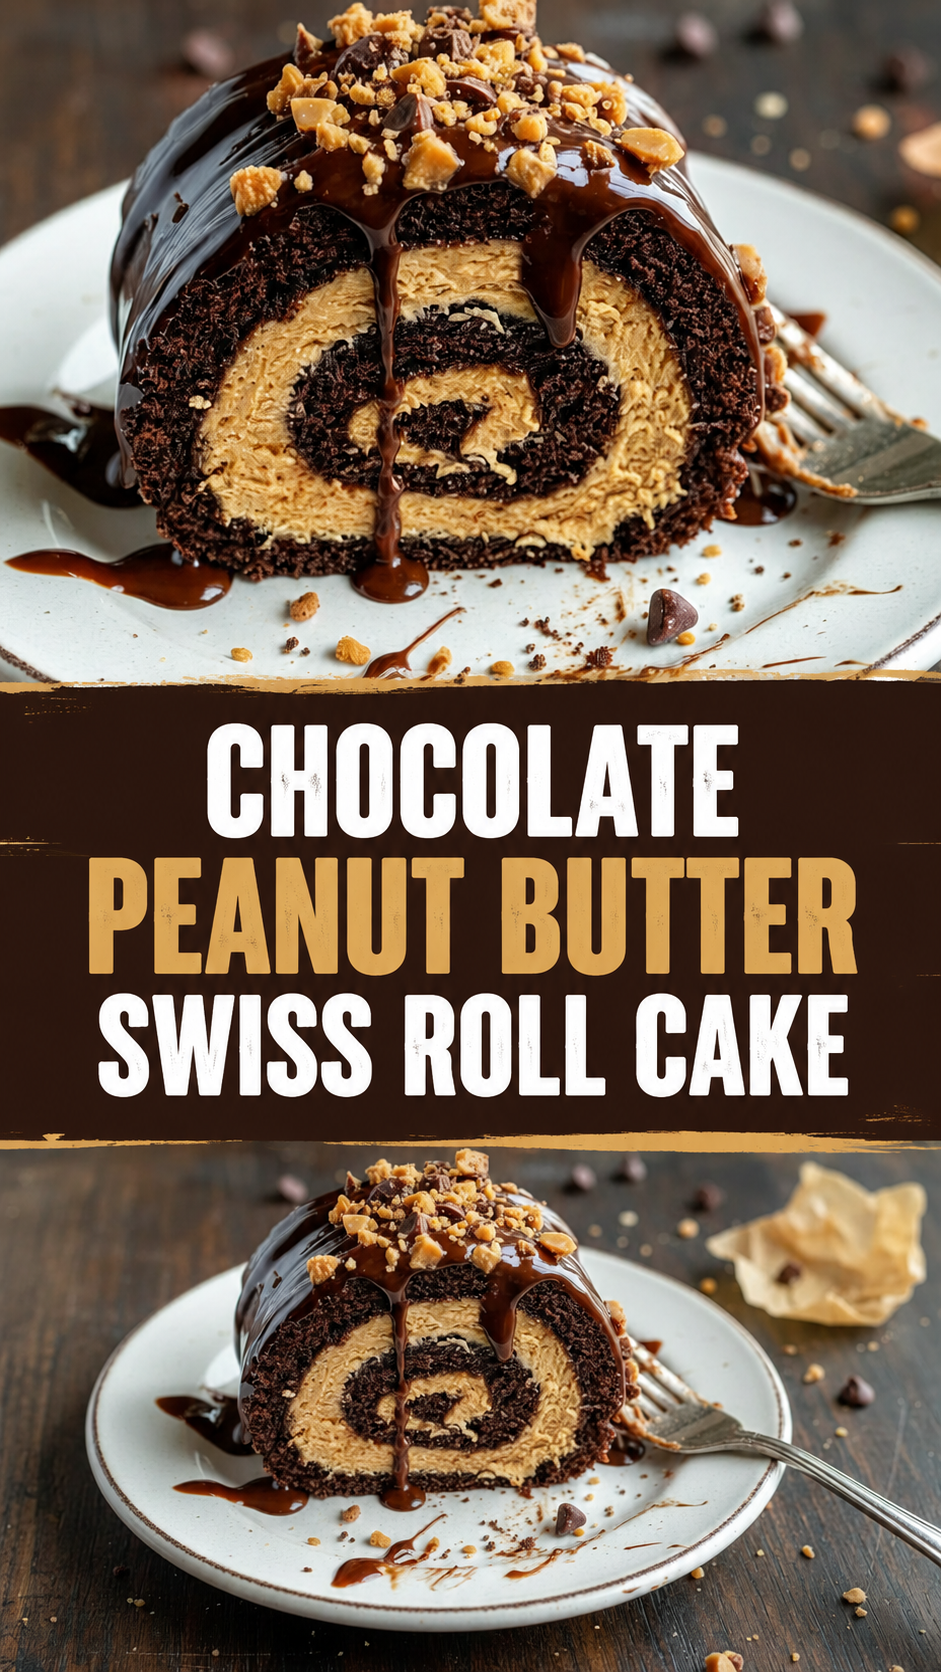
When you slice the cake, you will see a beautiful spiral of chocolate sponge and peanut butter filling. It looks like you spent hours on it. But really, the whole thing takes about an hour from start to finish.
I love serving this cake at family gatherings. It is special but not fussy. Everyone always asks for the recipe. Tell me, who would you share this cake with?
Instructions
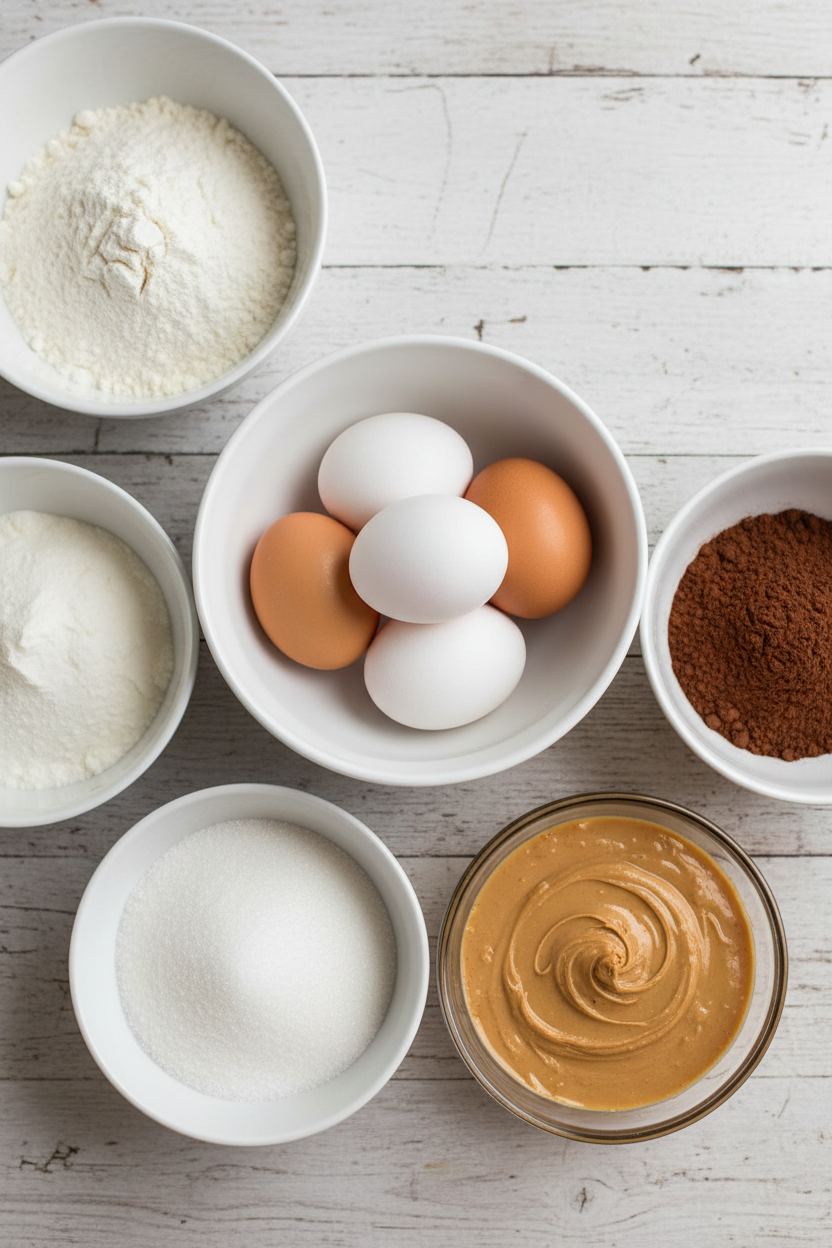
Step 1: Gather your ingredients. Make sure your eggs are at room temperature for the best rise. I always set them out an hour ahead. Preheat your oven to 350°F. Line a jelly roll pan with parchment paper, leaving some overhang to lift the cake out easily.
Step 2: Whisk flour, cocoa powder, baking powder, and salt in a medium bowl. In a large bowl, beat eggs and sugar on high for 4 to 5 minutes. The mix should get thick, pale, and triple in volume. (Tip: Don’t rush this — the air you beat in makes the sponge light and rollable.)
Step 3: Add oil, vanilla, and milk to the egg mixture. Stir gently until just combined. Overmixing will knock the air out. Remember to be gentle, like you’re giving a soft hug.
Step 4: Fold the dry ingredients into the wet with a spatula. Stop when no streaks of flour remain. The batter will be thick and fluffy. I still laugh thinking about the first time I forgot to fold — it was lumpy!
Step 5: Pour the batter into your prepared pan. Smooth it evenly with the spatula. This helps the cake bake uniformly. My grandma always said, a level batter is a happy cake.
Step 6: Bake for 10 to 12 minutes. The cake should spring back lightly when touched. Watch it carefully—overbaking makes it dry and crack when rolled. Doesn’t that smell amazing? What’s your favorite baking smell? Share below!
Step 7: Invert the hot cake onto a sugared towel. Peel off the parchment. Starting at a short end, roll the cake with the towel inside. Let it cool completely while rolled — this trains it to keep the shape.
Step 8: While it cools, beat peanut butter and powdered sugar until smooth. Add heavy cream and vanilla, mixing until light and spreadable. Fold in chopped peanut butter cups. I could eat this filling with a spoon!
Step 9: Carefully unroll the cooled cake. Spread the filling evenly, leaving a border around the edges. This keeps the filling from squishing out. Have you ever had a filling spill disaster? Share below!
Step 10: Re-roll the cake tightly without the towel. Place it seam-side down on a platter. Be gentle to avoid cracking the sponge. It’s like tucking in a cozy blanket.
Step 11: Optional ganache: heat heavy cream until steaming, pour over chocolate chips, let sit 2 minutes, then stir until smooth. Drizzle over the rolled cake. Let it set before slicing. Patience is worth it — trust me.
Creative Twists
… Swap the peanut butter for Nutella for a hazelnut-chocolate dream.
… Add a layer of sliced banana inside the roll for a fresh pop of fruit.
… Make it extra crunchy by folding crushed pretzels into the filling.
Which one would you try first? Comment below!
Serving & Pairing Ideas
Serve this roll with a tall glass of cold milk. It’s the classic companion. For a fancy finish, dust the top with powdered sugar or cocoa powder. You could also drizzle leftover ganache on each plate and add a few fresh raspberries. The tartness cuts the sweetness beautifully. Which would you choose tonight?
Storing Your Swiss Roll Cake
This cake is best eaten fresh, but you can store leftovers. Wrap it tightly in plastic wrap. It keeps in the fridge for up to three days. I remember my first Swiss roll. I forgot to wrap it, and it dried out overnight. What a sad lesson.
For freezing, slice the cake first. Wrap each slice in plastic, then put them in a freezer bag. They last up to two months. To reheat, let a slice sit at room temperature for 15 minutes. You can also microwave it for 10 seconds. This brings back the soft sponge and melty filling.
Batch cooking is smart. Make two rolls at once. Freeze one for later. That way you always have a treat ready. Storing it right means less waste. That matters because you worked hard on this cake. Have you ever tried storing it this way? Share below!
Three Common Problems and Easy Fixes
One: the cake cracks when you roll it. This happens if the sponge is too dry. The fix is simple. Bake it just 10 to 12 minutes. Do not overbake. I once left mine in a minute too long. It cracked like a puzzle.
Two: the filling oozes out. You spread too much or left no border. Leave a one-inch edge around the cake. That keeps the filling inside. *Fun fact: a small border also helps the roll hold its shape better.*
Three: the cake tastes flat. Your eggs may not have been beaten enough. Whip them on high for a full 4 to 5 minutes. They should triple in volume. This matters because air gives the cake its light texture. Fixing these problems builds your cooking confidence. You learn to trust your senses. Which of these problems have you run into before?
Your Quick Questions
Can I use crunchy peanut butter instead of creamy?
Yes, but the filling will be a bit lumpy. Creamy peanut butter makes a smooth, spreadable filling. If you use crunchy, the nuts might tear the sponge when you roll. I suggest sticking with creamy for this chocolate Swiss roll. The texture stays even, and the filling is easier to spread. You can always add chopped peanuts on top for crunch.
My ganache turned out grainy. What went wrong?
This usually happens when the cream is too hot. Heat the cream just until it steams, not boils. Pour it over the chocolate chips and let it sit two full minutes. Then stir slowly. If it still looks grainy, add a tiny splash of warm milk and keep stirring. For a silky ganache on your peanut butter cake, patience is key. Do not rush the stir.
How do I keep the roll from unrolling after I fill it?
After you re-roll the cake, place it seam-side down on a platter. Wrap it tightly in plastic wrap. Refrigerate for at least 30 minutes. The cold sets the filling and helps the sponge hold its shape. This trick works every time. Your chocolate peanut butter Swiss roll will stay neat and slice cleanly. Which tip will you try first?
A Warm Goodbye from Lily Simmer
I hope these tips help you make the perfect Chocolate Peanut Butter Swiss Roll Cake. Remember, every baker has a few cracked rolls. That is how we learn. I would love to hear about your experience. Have you tried this recipe? Tell me in the comments. Happy cooking!
—Lily Simmer

Chocolate Peanut Butter Swiss Roll Cake
Description
A rich chocolate sponge cake rolled with a creamy peanut butter filling and topped with optional chocolate ganache.
Ingredients
Chocolate Sponge Cake
Peanut Butter Filling
Add-Ins
Optional Chocolate Ganache Topping
Instructions
- Start by gathering all your ingredients. Make sure your eggs are at room temperature for the best rise in the sponge. Preheat your oven to 350°F and line a jelly roll pan with parchment paper, ensuring there is some overhang. This will help you easily lift the cake out later.
- In a medium bowl, whisk 3/4 cup of all-purpose flour, 1/4 cup of cocoa powder, 1 teaspoon of baking powder, and 1/4 teaspoon of salt. In another large bowl, beat together four large eggs and 3/4 cup of granulated sugar on high speed for 4 to 5 minutes until the mix is thick and pale, tripling in volume. This step is crucial for achieving the light and airy texture of your cake.
- Add 2 tablespoons of vegetable oil, 1 teaspoon of vanilla extract, and 1/4 cup of milk to the egg mixture, gently mixing until just combined. Be careful not to overbeat at this stage, as you want to keep as much air in the batter as possible.
- Now, gently fold the dry ingredients into the wet mixture using a spatula. Mix until there are no visible streaks of flour. You should have a thick and fluffy batter at this point.
- Pour the batter evenly into your prepared jelly roll pan, smoothing the top gently with a spatula. You want an even layer to ensure the cake cooks uniformly.
- Bake in the preheated oven for about 10 to 12 minutes, or until the cake springs back lightly when touched. Watch it carefully to avoid overbaking, which can dry out the sponge and make it less flexible.
- Once baked, immediately invert the hot cake onto the prepared sugared towel. Carefully peel off the parchment paper. Starting from one of the short ends, roll the cake with the towel inside. Allow it to cool completely while rolled up. This helps to maintain its shape.
- While the cake cools, beat 3/4 cup of creamy peanut butter with 1/2 cup of powdered sugar in a bowl until smooth. Then add 1/2 cup of heavy cream and 1 teaspoon of vanilla extract, mixing until light and spreadable. Finally, gently fold in the chopped peanut butter cups.
- Once the cake is completely cool, carefully unroll it. Spread the peanut butter filling evenly across the surface, leaving a border around the edges. This helps prevent the filling from spilling out when you roll it back up.
- Re-roll the cake tightly without the towel, ensuring it is seam-side down on a serving platter. This should be done gently to avoid breaking the sponge.
- To create the optional chocolate ganache topping, heat 1/2 cup of heavy cream until it’s just steaming. Pour it over 3/4 cup of semi-sweet chocolate chips and let it sit for 2 minutes. Stir until smooth. Drizzle or spread the ganache over the cake, allowing it to set before slicing.
Step 1 – Prepare Ingredients
Step 2 – Cook the Base
Step 3 – Combine Wet Ingredients
Step 4 – Fold in Dry Ingredients
Step 5 – Pour and Smooth Batter
Step 6 – Bake the Cake
Step 7 – Roll the Cake
Step 8 – Prepare the Filling
Step 9 – Unroll and Fill the Cake
Step 10 – Re-Roll and Set the Cake
Step 11 – Make the Ganache (Optional)
Notes
- Prep cake pan with parchment; grease well. Beat eggs and sugar until thick and pale for sponge structure. Fold in dry ingredients gently to avoid deflating. Roll cake while warm in a towel dusted with powdered sugar to prevent cracking. Cool completely before unrolling. Whip heavy cream with peanut butter and sugar until stiff. Spread filling evenly, re-roll tightly. Chill 1 hour before slicing. Use a serrated knife for clean cuts.