My First Bunny Tail Kitchen Mess
The first time I made these truffles, my kitchen looked like a coconut snowstorm. I had shredded coconut stuck to my apron, the counter, even my glasses. My granddaughter giggled and said I looked like a bunny that exploded.
But you know what? Those messy little balls turned out perfect. Soft, sweet, and covered in pastel colors. I still laugh at that memory every time I make them.
Have you ever had a baking moment that turned into a funny mess? Tell me in the comments below.
Where Bunny Tails Come From
People have been making little coconut sweets for a long time. In many countries, coconut treats are a way to celebrate spring and new life. These truffles look just like a fluffy bunny tail.
That is why they feel so special for Easter or any party. You bite into something that tastes like sunshine and feels soft like cotton. It makes you smile without even trying.
*Fun fact: Real bunny tails are actually white underneath the fur. The fluffy part you see is just hair. So our truffles are extra fluffy on purpose.*
The Secret to a Soft Center
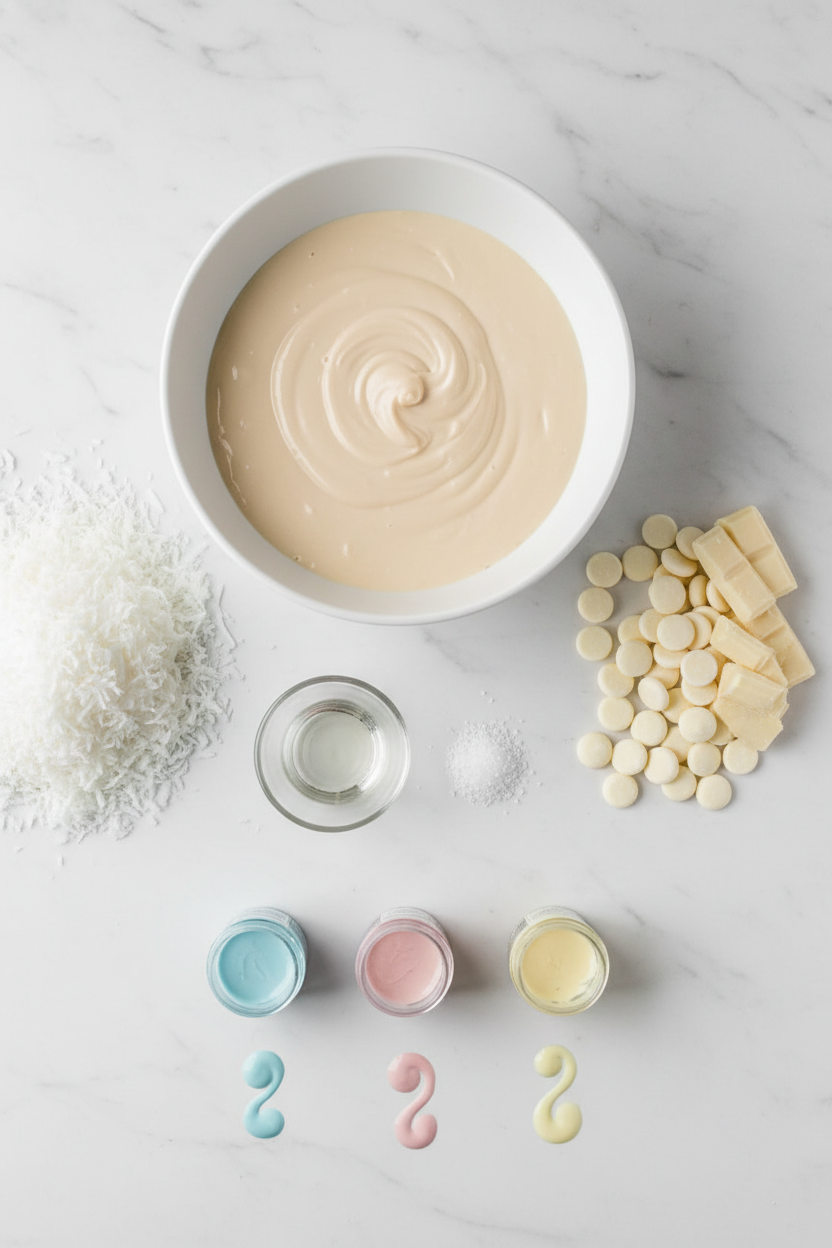
The filling is simple. Just shredded coconut, sweetened condensed milk, vanilla, and a pinch of salt. That little salt makes all the sweetness taste brighter.
Why does this matter? Because good food does not need fancy steps. Sometimes the easiest recipes give the biggest hugs. You mix, you roll, you chill. That is all.
Doesn’t that smell amazing when you stir it together? I always take a big whiff. It smells like a coconut cloud.
Shape Them Like You Mean It
Rolling the balls is my favorite part. You press the sticky mixture between your palms until it forms a smooth, round shape. If it is too soft, just add a little more coconut.
I once let my grandson do the rolling. He made them into tiny eggs instead of balls. We called them bunny egg truffles. They tasted just as good.
Do you like making your treats look perfect, or do you let them be silly? I vote silly every time.
Dip and Sprinkle Like a Pro
After the balls are firm and cold, you dip them in melted white chocolate. I like to split the chocolate into three bowls and add pastel colors. Pink, blue, and yellow look like Easter basket confetti.
Then comes the fun part. Before the coating dries, you roll each truffle in more shredded coconut. That gives them the fuzzy bunny look. It also adds a little crunch.
Why does this matter? Because the texture makes people happy. Soft inside, smooth outside, fluffy on top. Every bite is a little adventure.
Here is a question for you: Which pastel color would you pick first? Pink? Blue? Yellow? Or maybe all three?
Share Them While They Last
These truffles keep in the fridge for about five days. But in my house, they disappear in two. Everyone grabs one when they walk by the kitchen.
I like to put them in a little box with a ribbon. They make a great gift for teachers, neighbors, or just for yourself. You deserve a fluffy treat after all that rolling.
Have you ever given homemade candy as a present? I would love to hear your story. Drop a note in the comments.
Instructions
Step 1: In a big bowl, mix the shredded coconut, sweetened condensed milk, vanilla, and salt. Stir until it gets thick and sticky. (If it feels too soft, add a little more coconut a spoonful at a time.) Doesn’t that sweet coconut smell remind you of spring? What’s your favorite spring dessert? Share below!
Step 2: Scoop out spoonfuls and roll them into smooth balls about an inch wide. Wet your hands slightly so the mixture doesn’t stick to your palms. Place each ball on a parchment-lined baking sheet. How big do you like your truffles? Bite-size or bigger? Share below!
Step 3: Pop the baking sheet in the fridge for at least one to two hours. This helps the truffles hold their shape when you dip them later. (I learned the hard way: skip the chill and they fall apart in the warm coating.) Do you ever sneak a taste before they’re done? I won’t tell! Share below!
Step 4: Melt the white candy melts in the microwave in short bursts, stirring each time. Divide the melted coating into separate bowls and stir in pastel gel food coloring. (Use gel, not liquid, so the candy stays smooth and glossy.) Which pastel color makes you happiest? Pink, blue, yellow, or green? Share below!
Step 5: Take the chilled balls out of the fridge. Use a fork to lower one into the colored coating, roll it around, then lift and tap the fork gently to let extra drip off. Place the coated truffle back on the baking sheet. Have you ever tried dipping with a toothpick instead? Share below!
Step 6: While the coating is still wet, sprinkle or roll the truffle in more shredded coconut to make it look fluffy like a bunny tail. Work quickly before the coating sets. (I sometimes do a second roll for extra fluff.) Doesn’t that coconut finish make them look so cute? Share below!
Creative Twists
… Press a tiny jellybean into the center before chilling for a hidden candy surprise.
… Swap white chocolate for dark chocolate and roll in toasted coconut for a richer flavor.
… Add a pinch of cinnamon or orange zest to the filling for a warm, spicy twist.
Which one would you try first? Comment below!
Serving & Pairing Ideas
Serve these truffles on a pretty plate with fresh strawberries and a cup of hot cocoa. They also look adorable tucked into a small basket lined with pastel napkins. For a spring party, arrange them on a cupcake stand with a few sprigs of mint. Which would you choose tonight?

Storing Your Bunny Tail Truffles
I remember my first batch of these truffles. I was so proud. Then I left them out overnight. The coating got sticky and the insides went soft. Now I always keep them in a closed container in the fridge. They stay firm and fresh for up to five days.
If you want to make a big batch for later, the freezer is your friend. Put the shaped, undipped balls on a tray and freeze them until solid. Then pop them into a freezer bag. They will keep for two months. Just thaw them in the fridge before dipping.
You never want to reheat these truffles in the microwave. The coconut filling gets too soft and the coating turns white and streaky. Let them sit at room temperature for ten minutes instead. That is all they need.
Batch cooking saves time. When you make a double batch, you have treats ready for a birthday or a spring party. It also means less mess to clean up later. Have you ever tried storing it this way? Share below! *Fun fact: Chilling the filling for at least one hour makes it much easier to roll into balls.*
Three Common Problems and Easy Fixes
The first problem is a sticky filling. If your mixture feels too wet to roll, add more shredded coconut one spoonful at a time. I once added three extra spoonfuls and the balls held together perfectly. The mixture should feel like soft play dough.
The second problem is the coating cracking after it sets. This happens when the truffle is too cold when you dip it. Let the chilled balls sit on the counter for five minutes first. That one little step saves your smooth coating.
The third problem is the coating seizing up and turning grainy. This usually means water got into the melted candy. Always use a dry bowl and dry tools. Do not cover the bowl while the candy is hot. Which of these problems have you run into before?
Fixing these small issues matters because it builds your confidence in the kitchen. When you know how to fix a sticky dough or a lumpy coating, you stop feeling nervous. The food also tastes better. A smooth coating melts evenly in your mouth.
Your Quick Questions
Can I use regular food coloring for the candy coating?
Regular liquid food coloring can cause the white chocolate to seize and become thick and lumpy. You should use paste or gel food coloring instead. These are more concentrated and contain less water. Stir in the gel just a tiny drop at a time. You will get a soft pastel shade without ruining the smooth texture of the coating. Oil-based candy coloring also works very well.
Why do I need to chill the truffles for so long?
The sweetened condensed milk and shredded coconut make a soft, sticky filling. If you skip the chill, the balls will flatten or even fall apart when you dip them in the warm candy coating. At least one hour in the fridge firms up the fat in the coconut. Overnight chilling is even better because the balls become very solid. This makes dipping fast and clean.
Can I skip the shredded coconut on the outside?
You can leave it off if you prefer a smooth truffle. The shredded coconut on the outside is what gives these truffles their bunny tail look. It also adds a nice texture crunch against the creamy inside. If you do skip it, let the coated truffles sit until the candy is fully set. Then you can add a tiny drizzle of colored chocolate on top for decoration. Which tip will you try first?
A Sweet Goodbye from Lily
I hope these little tips help you make the prettiest truffles for your spring table. They really are simple once you know a few tricks. Please come back and tell me how yours turned out. Have you tried this recipe? I love hearing from you. It makes my kitchen feel a little less quiet. Happy cooking!
—Lily Simmer

Pastel Coconut Bunny Tail Truffles
Description
These adorable Pastel Coconut Bunny Tail Truffles are a fun Easter treat with a creamy coconut center and colorful coating.
Ingredients
FOR THE COCONUT FILLING:
FOR THE COATING:
Instructions
- In a large mixing bowl, combine the sweetened shredded coconut, sweetened condensed milk, vanilla extract, and salt. Stir with a spoon or spatula until the mixture becomes thick, sticky, and evenly blended. If the mixture feels too soft to hold its shape, add additional shredded coconut one tablespoon at a time until it can be pressed together easily.
- Scoop the mixture using a small cookie scoop or tablespoon. Roll each portion between your palms to form smooth balls about 1 inch in diameter. Place the balls on a baking sheet lined with parchment paper, spacing them slightly apart.
- Transfer the baking sheet to the refrigerator and chill for at least 1 to 2 hours, or until the balls feel firm to the touch. Chilling helps the truffles maintain their round shape during dipping and prevents them from falling apart in the melted coating.
- Melt the white candy melts or white chocolate according to package instructions. Heat in the microwave in 20 to 30 second intervals, stirring well between each interval until fully melted and smooth. Divide the melted coating into separate bowls and stir in small amounts of pastel gel food coloring to create soft spring shades. Mix until the color is evenly distributed.
- Remove the chilled coconut balls from the refrigerator. Using a fork or dipping tool, lower one ball at a time into the melted candy coating. Roll gently to coat completely, then lift it out and tap the fork lightly against the bowl to remove excess coating. Place the coated truffle back onto the parchment-lined baking sheet.
- Before the candy coating sets, sprinkle or roll each coated truffle in the remaining shredded coconut to create a fluffy bunny tail appearance. Allow the truffles to sit at room temperature until the coating hardens completely.
MIX THE COCONUT FILLING
SHAPE THE TRUFFLES
CHILL THE TRUFFLES
MELT AND COLOR THE COATING
DIP THE TRUFFLES
ADD THE COCONUT FINISH
Notes
- Store the truffles in an airtight container in the refrigerator for up to 5 days. For easier dipping, chill the shaped coconut balls overnight. Use oil-based or gel food coloring designed for candy to prevent the coating from seizing.
- Chill truffle mixture thoroughly before shaping for easy handling. Use wet hands to roll into smooth balls. Coat generously in shredded coconut; press gently to adhere. For pastel colors, tint coconut with gel food coloring and let dry. Store in airtight container in fridge up to one week. Bring to room temp before serving for best texture.