My First Time Making No-Bake Cheesecake Jars
I remember the first time I made these pretty cheesecake jars. My little niece was visiting, and she wanted to help with dessert. She kept asking, “Can we put sprinkles on top?” I laughed and said, “Of course. We can even hide candy eggs inside.” She thought that was the best idea ever. Doesn’t it sound fun to build your own little dessert in a jar?
These jars are perfect for spring or Easter. But really, you can make them any time you want something sweet and pretty. No oven needed. That means even a rainy afternoon can turn into a cheerful baking day. Have you ever made a dessert that didn’t need baking? What was it?
Why No-Bake Desserts Are So Special
When I was a girl, my grandma would let me stir the pudding on the stove. But we didn’t have fancy no-bake cheesecakes like these. They are so much easier. No worry about cracking or burning. Just mix, layer, and chill. That is why I love sharing recipes like this one.
This matters because anyone can make a no-bake dessert. Kids, grandparents, even someone who has never cooked before. It builds confidence. And when you see those pretty layers, you feel proud. *Fun fact:* Cream cheese was invented in New York in 1872, but people have been making no-bake treats for hundreds of years.
The Crust That Feels Like Damp Sand
The first step is the crust. You mix graham cracker crumbs, sugar, and melted butter. Stir until it feels like damp sand you’d build a castle with at the beach. I always let my niece press it down with the back of a spoon. She made little craters, but that was fine. The crust doesn’t have to be perfect. It just has to be yummy.
Do you like a thick crust or a thin one? I prefer a thick layer so every bite has crunch. You can also use crushed cookies instead of graham crackers. That changes the flavor a lot. Tell me, what is your favorite kind of cookie crust?
Making the Cheesecake Light and Fluffy
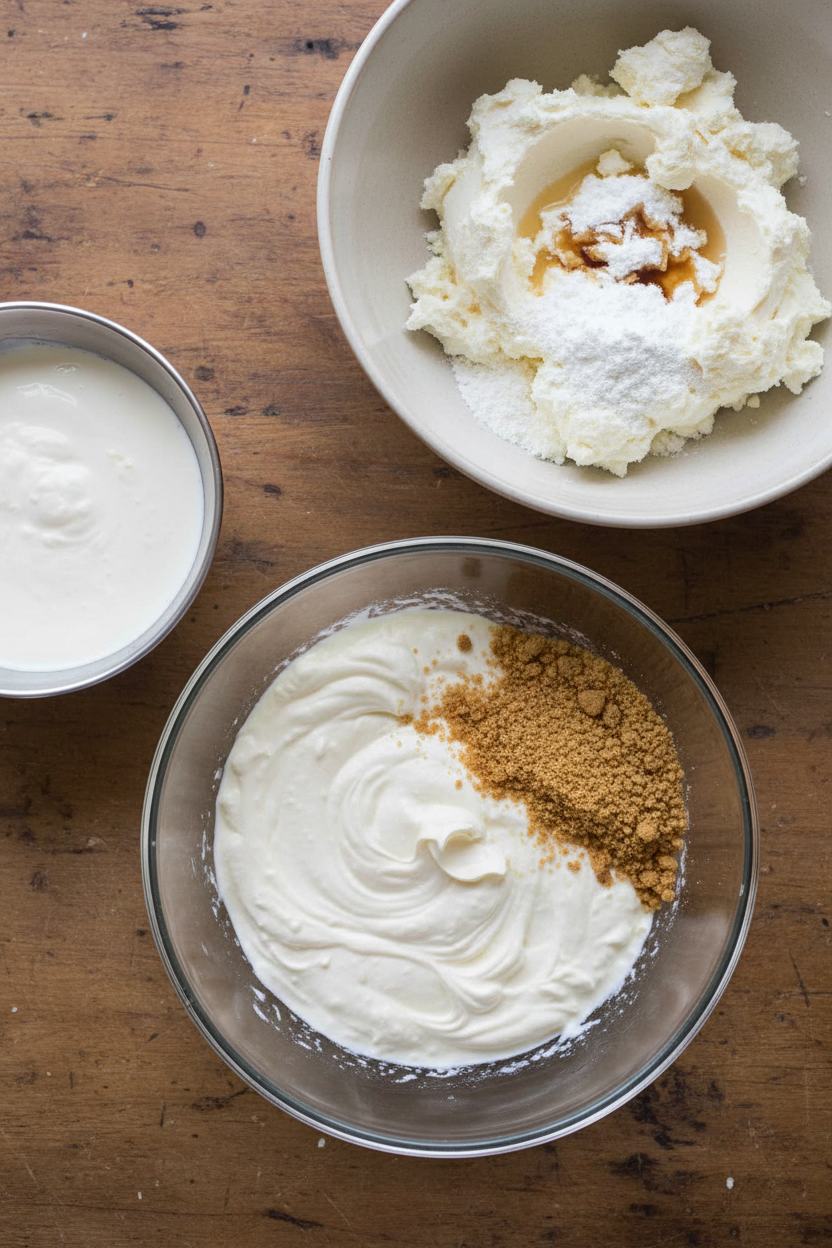
Here is where the magic happens. You beat the cream cheese until it is smooth like butter. Then add powdered sugar and vanilla. In another bowl, whip the heavy cream until it forms stiff peaks. That means when you lift the whisk, the cream stands up tall. You gently fold the cream into the cheese mixture. Do not stir hard. Be soft and slow.
Why does this matter? The light folding keeps all those tiny air bubbles inside. Those bubbles make the cheesecake fluffy instead of heavy. I once folded too fast and lost all the air. The filling turned flat. Still tasted good, but not as dreamy. Have you ever whipped cream until it turned into butter by accident? I have. It is a funny mistake.
Pastel Colors for a Pretty Look
I love pastel colors. They remind me of baby chicks and spring flowers. To get that pink layer, I use a tiny drop of pink gel food coloring. Or you can use freeze-dried strawberry powder. That gives a real fruit taste and a natural pink color. I once used too much coloring and got bright neon pink. We laughed and called it “bubblegum cheesecake.” Still delicious.
You can also make other pastel shades. Blue, lavender, or yellow. Just a tiny bit of coloring goes a long way. If you were making these jars, what color would you choose? I think a soft lavender would be so pretty.
Layering and Decorating Like a Garden
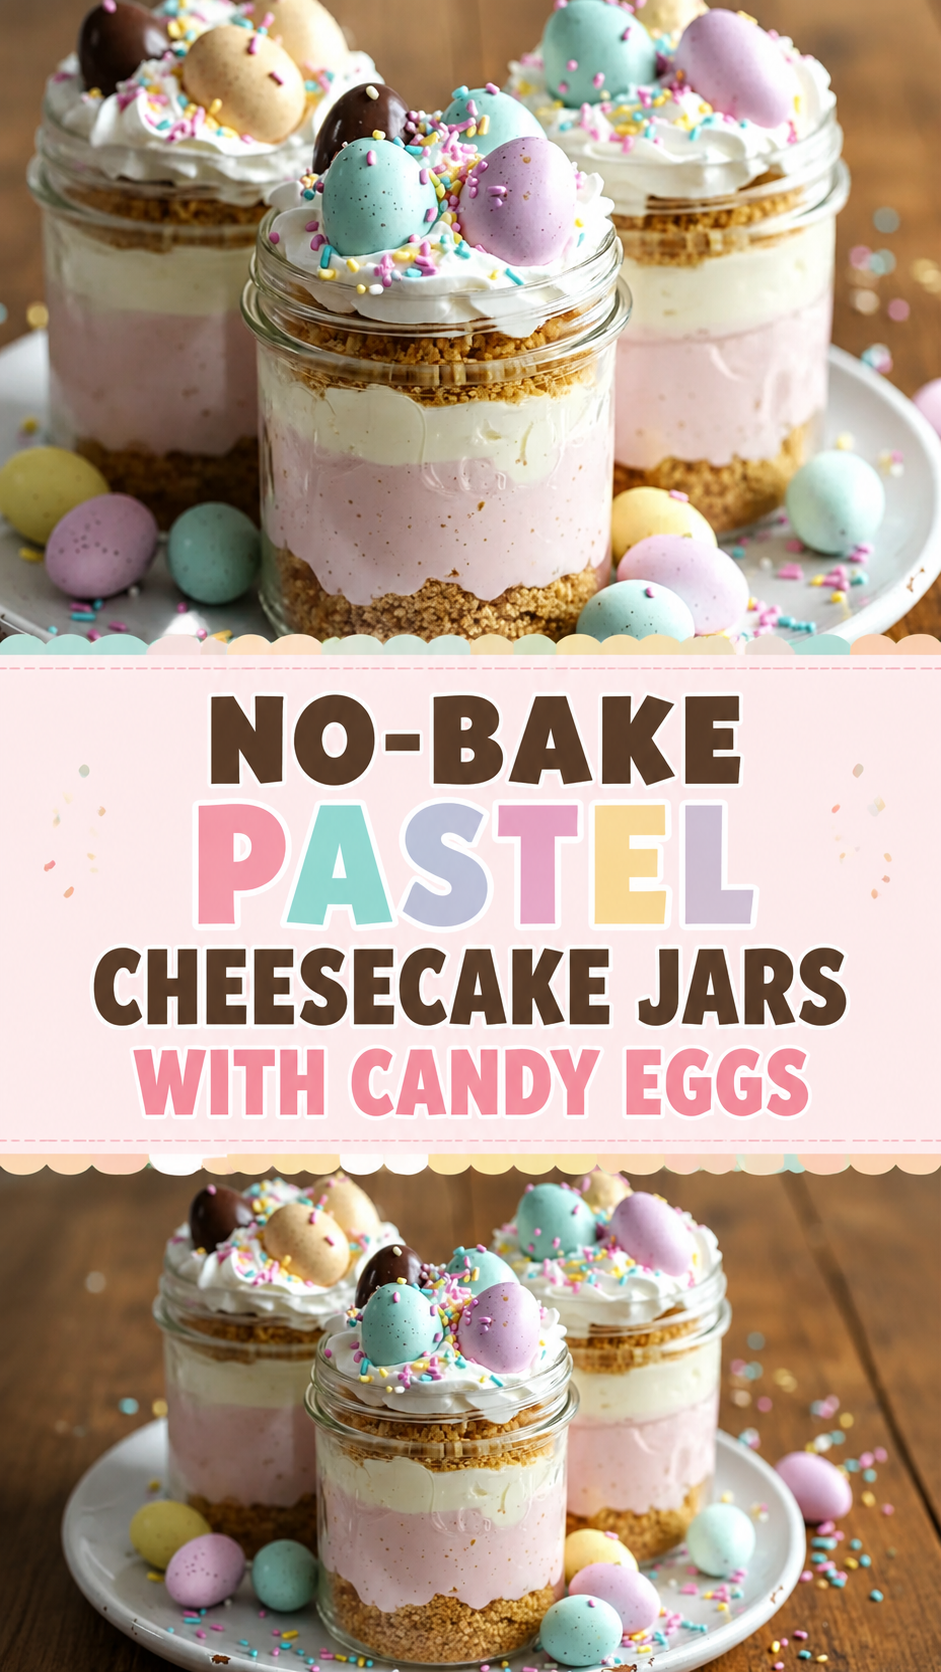
Now comes the fun part. You spoon or pipe the pink cheesecake over the crust. Then add the white layer on top. I like to pipe around the edge first so it looks neat. Then I add a swirl of whipped cream. Right before serving, you place the candy eggs on top and sprinkle with pastel sprinkles. It really looks like a little garden in a jar.
This matters because how food looks changes how we feel about it. When you take the time to make something beautiful, you enjoy it more. Even a simple jar can become a gift. I like to give these to neighbors or teachers. They always smile. Do you think you would make these for a friend’s birthday or just for yourself?
The Joy of Sharing No-Bake Jars
These cheesecake jars are best when shared. They are small and portable. You can take them on a picnic or to a potluck. No plates needed. Just a spoon and a happy heart. I still remember the look on my niece’s face when she handed one to her dad. She said, “I made this.” It was such a proud moment.
So now I ask you: Have you ever made a dessert in a jar before? What was your favorite part? I would love to hear your stories. And if you try this recipe, let me know how your little garden turns out.
Instructions
Step 1: Mix graham cracker crumbs, sugar, and melted butter in a bowl. Stir until it feels like damp sand. (A tip: use your fingers to check the texture.) Press the mixture into the bottom of each jar. That crust is the cozy blanket for your cheesecake.
Step 2: Beat the softened cream cheese in a large bowl until smooth and fluffy. Add powdered sugar and vanilla, then beat again. I always scrape the sides twice so nothing hides. Does your cream cheese feel silky? That is the secret for a creamy filling.
Step 3: In a separate bowl, whip the heavy cream until stiff peaks form. Gently fold it into the cream cheese mixture in two parts. Be careful not to stir too hard or you will lose the air. I remember the first time I over-mixed – the filling turned soupy! Learn from my kitchen mistake.
Step 4: Divide the cheesecake filling into two bowls. Stir pink gel food coloring into one bowl until it turns a pretty pastel. Layer the pink filling over the crust, then spoon the white filling on top. Use a piping bag for neat edges. What is your favorite pastel color? Share below!
Step 5: Right before serving, pipe a generous swirl of whipped cream on each jar. Top with candy eggs and a sprinkle of rainbow sprinkles. It looks like a tiny spring garden in a jar. My grandkids always argue over who gets the most candy eggs.
Step 6: Chill the jars for at least one hour before serving. This lets the layers set nicely. You can even make them the night before – the flavors get even better. Just add the whipped cream and candy eggs right before you serve.
Creative Twists
… Swap the graham crackers for crushed vanilla wafers or shortbread cookies.
… Use lemon zest or a drop of lemon extract in the cheesecake for a bright, zingy twist.
… Replace the candy eggs with mini chocolate eggs or crushed pretzels for a salty-sweet crunch.
Which one would you try first? Comment below!
Serving & Pairing Ideas
These cheesecake jars are perfect for an Easter brunch or a spring picnic. Serve them with fresh berries on the side for a pop of color. A small glass of cold milk or a cup of chamomile tea pairs nicely with the creamy sweetness. You can also line the jars on a platter with edible flowers for a pretty centerpiece. Which would you choose tonight?
Storing Your Cheesecake Jars the Right Way
These little jars keep beautifully in the fridge. I once made them the night before a spring brunch and forgot about them until noon the next day. They were still perfect. Just cover each jar tightly with plastic wrap or a lid. They stay fresh for up to three days. The graham cracker crust stays crunchy if you press it firmly.
You can also freeze them. Freeze the jars without the whipped cream topping. Wrap each jar in plastic wrap, then foil. They last for a month. To serve, thaw them in the fridge overnight. Then add fresh whipped cream and candy eggs right before eating. *Fun fact: No-bake cheesecake freezes even better than baked cheesecake because the texture stays creamy.* Batch cooking saves time and lets you have dessert ready for last-minute guests. Why this matters: When you store food well, you waste less and always have something special to share. Have you ever tried storing it this way? Share below!
Three Common Problems and Easy Fixes
First problem: a crumbly crust that falls apart. I remember my first try; the crust was too dry. Fix it by adding one more tablespoon of melted butter. The texture should feel like damp sand.
Second problem: lumpy cheesecake filling. Your cream cheese must be fully softened. Let it sit on the counter for an hour. Beat it well before adding anything else. Smooth filling means smooth jars.
Third problem: the layers mix together. Pipe the filling instead of spooning it. Start around the edge of the jar and work inward. This gives you neat, separate pastel and white stripes. Why these fixes matter: Solving small problems builds your confidence in the kitchen. You learn that cooking is adjustable. And when the flavor looks as good as it tastes, everyone feels proud. Which of these problems have you run into before?
Your Quick Questions
Can I use low-fat cream cheese?
Yes, but the filling will be less creamy and a bit softer. Low-fat cream cheese has more water, so it won’t hold its shape as well. If you want a lighter version, try Neufchatel cheese. It has less fat but still gives you a smooth, rich texture. For the best no-bake cheesecake texture, full-fat cream cheese is always the winner. The difference in taste is small, but the texture really matters.
What if I don’t have gel food coloring?
You can use freeze-dried strawberry powder or even a teaspoon of beet juice. Gel coloring gives the prettiest pastel pink without making the filling watery. Liquid food coloring works too, but add it drop by drop. Too much liquid can thin the cheesecake. I sometimes skip the color and just use plain white filling. The candy eggs on top already bring plenty of color. Which tip will you try first?
A Warm Goodbye from Lily Simmer
Thank you for stopping by my little kitchen corner. I hope these jars bring a smile to your table. They remind me of Easter mornings and spring picnics. Making something pretty and delicious does not have to be complicated. You already have everything you need. Have you tried this recipe? I would love to hear about your pastel creations. Drop a comment below and tell me how it went. Happy cooking! —Lily Simmer.

No-Bake Pastel Cheesecake Jars with Candy Eggs
Description
A delightful no-bake cheesecake in jars with pastel layers and candy eggs.
Ingredients
For the crust:
For the cheesecake layers:
For the topping:
Instructions
- Step 1: I start by combining the graham cracker crumbs, sugar, and melted butter in a bowl. I stir it all together until the texture reminds me of damp sand.
- Step 2: Then, I spoon the crumb mixture into the bottom of each jar. I gently press it down with the back of a spoon to form a nice, even base.
- Step 3: In a large mixing bowl, I beat the softened cream cheese until it’s completely smooth and fluffy. I always scrape the sides a couple of times to make sure everything blends evenly.
- Step 4: Next, I add the powdered sugar and vanilla extract and beat it again until it’s light and airy.
- Step 5: In a separate bowl, I whip the heavy cream until stiff peaks form. Then, I gently fold it into the cream cheese mixture in two parts, being careful not to deflate it.
- Step 6: I divide the cheesecake filling into two bowls. To one, I add a drop of pink gel food coloring or a little strawberry powder, and stir it in until I get that pretty pastel tone.
- Step 7: Using a spoon or piping bag, I layer the pink cheesecake over the crust. Then I follow up with the plain white layer. I like to pipe around the edge first for a neat finish.
- Step 8: Right before serving, I pipe a generous swirl of whipped cream on top of each jar.
- Step 9: I finish them off by decorating with candy eggs and a sprinkle of rainbow or pastel sprinkles. It’s like building a little garden in each jar.
Notes
- Chill all ingredients.
- Use full-fat cream cheese for best texture.
- Crush cookies finely for crust.
- Whip cream to stiff peaks before folding.
- Layer evenly in jars.
- Chill at least 4 hours before adding candy eggs.
- Pastel colors from gel food coloring; add drop by drop.