My First Red Velvet Cake
I remember the first time I made a red velvet cake. I was just a girl, helping my grandmother in her tiny kitchen. We mixed the batter by hand, and my fingers turned pink from the food coloring. I still laugh at how messy we got. That cake tasted like love and a little bit of mischief. Have you ever baked something that brought back a sweet memory?
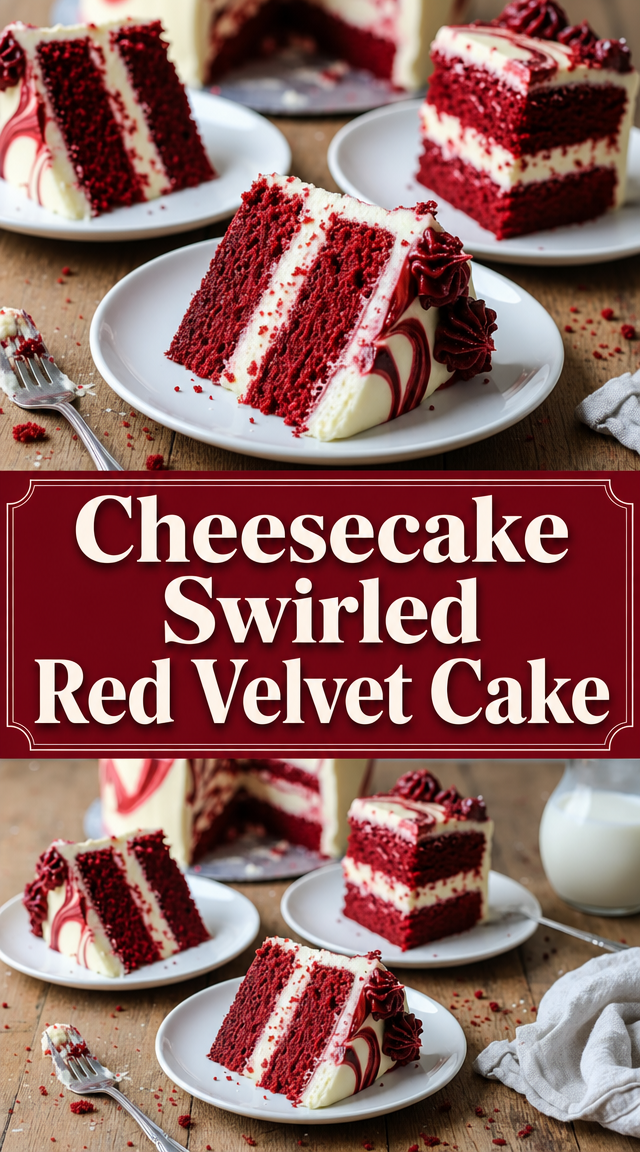
This Cheesecake Swirled Red Velvet Cake is a twist on that old recipe. It’s like two treats in one. The red velvet is soft and tender. The cheesecake is creamy and smooth. Doesn’t that smell amazing? Well, you’ll have to bake it to find out.
A Little History in Every Bite
Red velvet cake isn’t just a pretty color. It goes back to the 1920s. Bakers used natural cocoa powder, which turned red when mixed with buttermilk and vinegar. That reaction gave the cake its name. *Fun fact: The first red velvet cakes were not bright red. They were a rusty brownish-red from the cocoa and vinegar mix.* Today we use food coloring to make it pop.
This recipe keeps that old soul. The buttermilk and vinegar still make the cake extra soft. The cheesecake swirl adds a new story. Why does this matter? Because food connects us to generations. Each swirl is a little piece of history on your fork.
Why the Swirl Wins
The cheesecake swirl is my favorite part. You spoon dollops of creamy filling onto the red velvet batter. Then you gently swirl it with a knife. Don’t overdo it. You want ribbons of cream cheese, not mud. The result is a surprise in every slice. Do you prefer one big swirl or lots of little ones?
Here’s why this matters: the cream cheese layer keeps the cake moist. Red velvet can sometimes be dry. But that creamy cheesecake locks in moisture. Plus, the tangy flavor balances the sweet cocoa. It’s a perfect partnership.
Tips from My Kitchen to Yours
Measure your flour correctly. Spoon it into the cup, then level it off. Too much flour makes a dense cake. And let your cream cheese soften before mixing. Cold cream cheese makes lumpy swirls. I learned that the hard way. Have you ever had a baking mishap that taught you something?
Also, use room-temperature eggs. They mix in better and give the cake a lighter crumb. And don’t skip lining your pans with parchment paper. It’s the secret to getting the cake out clean. A little prep saves a lot of tears.
The Baking Magic
When the cake bakes, your kitchen will smell like vanilla and cocoa. I always peek through the oven window. The cheesecake swirls puff up a little. That’s when I know it’s going to be good. Test with a toothpick. If it comes out clean or with a few crumbs, it’s done. Do you like to watch your cake rise through the glass?
After baking, cool the cakes completely. Frost them with the leftover cheesecake mixture. Or use cream cheese frosting. I like to keep it simple. The swirls are already special enough. Each slice looks like a work of art.
Sharing the Sweetness
This cake is for birthdays, holidays, or just a Tuesday. It makes people smile. I once brought it to a potluck, and there were no leftovers. Someone even licked the plate. That’s the best compliment a baker can get. What occasion would you bake this cake for?
So go ahead. Invite a friend to help you swirl. Or bake it alone and keep it all for yourself. Either way, you’re making a memory. That’s what good food is all about.
Instructions
Step 1: Grease two 9-inch round cake pans and line them with parchment paper. Preheat your oven to 350°F (175°C). Getting the pans ready first makes everything smoother later. (I always tap the parchment flat so it doesn’t curl up — learned that the hard way!)
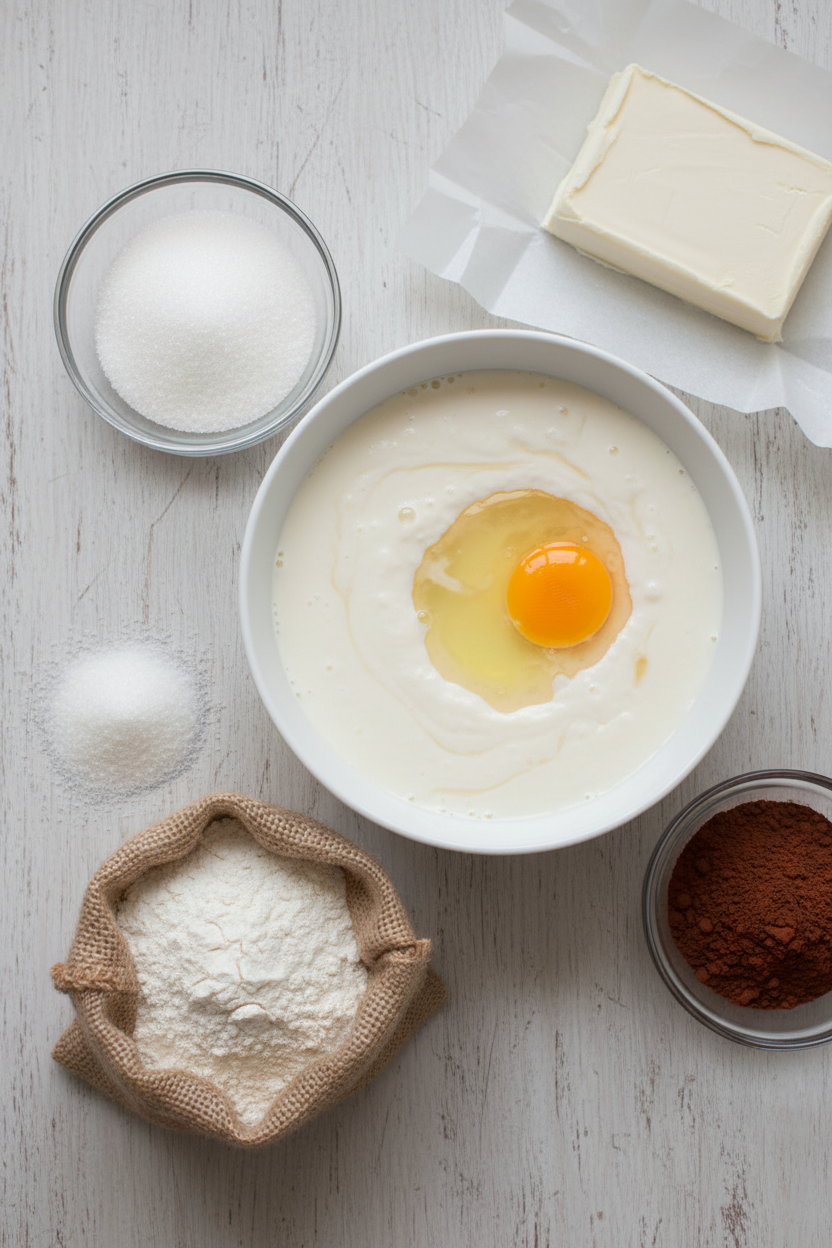
Step 2: In a big bowl, whisk together flour, sugar, cocoa powder, baking soda, and salt. Make sure there are no lumps. My grandma always said sifting makes the cake fluffier — do you sift your dry ingredients? Share below!
Step 3: In another bowl, mix buttermilk, oil, eggs, vinegar, vanilla, and red food coloring. Stir until it looks like a bright red milkshake. I still remember my first time — my hands turned pink for a whole day!
Step 4: Pour the wet mix into the dry mix slowly. Stir gently until it all comes together. Don’t overmix or the cake will be tough. Just a few stirs past combined is perfect.
Step 5: Beat cream cheese until creamy, then add powdered sugar and vanilla. Mix until light and fluffy. This is your cheesecake swirl — tastes just like frosting heaven.
Step 6: Divide the red velvet batter between the two pans. Drop spoonfuls of cheesecake mixture on top, then swirl with a knife. I like to make figure-eights — doesn’t that sound fun?
Step 7: Bake for 30–35 minutes. Test with a toothpick — if it comes out clean, you’re done. Let cool completely before frosting with the leftover cheesecake mix or cream cheese frosting. So worth the wait.
Creative Twists
… Add a teaspoon of cinnamon to the dry ingredients for a warm, spicy kick.
… Swap the red food coloring for beet powder — it’s natural and gives a lovely earthy sweetness.
… Sprinkle crushed chocolate cookies on top of the cheesecake swirl before baking for extra crunch.
Which one would you try first? Comment below!
Serving & Pairing Ideas
Serve a thick slice with a dollop of whipped cream and fresh raspberries. The tartness cuts through the richness beautifully. Or pair it with a cold glass of milk — my grandson’s favorite way. For a fancy touch, drizzle warm chocolate sauce over each slice. Which would you choose tonight?
Storing Your Red Velvet Cheesecake Cake
This cake keeps well in the fridge for up to five days. Wrap it in plastic wrap first, then foil. The cheesecake swirl stays creamy and soft.
For longer storage, freeze individual slices. Place them on a baking sheet until firm. Then wrap each slice tightly and pop into a freezer bag. They last about three months.
To reheat, let a slice sit at room temperature for 20 minutes. Or warm it in the microwave for 10 seconds. The swirl will stay smooth if you go slow.
I remember the first time I stored this cake. I wrapped it too tight and the swirl got messy. Now I use wax paper between the cake and plastic wrap. *Fun fact: Red velvet cake originally got its color from a chemical reaction between cocoa and buttermilk, not food coloring.*
Batch cooking matters because it saves time on busy days. Bake two cakes at once and freeze one. You will have a treat ready for company or a quiet night. Have you ever tried storing it this way? Share below!
Fixing Common Baking Problems
Sometimes the cake sticks to the pan. Grease the pans well and line them with parchment paper. This is my number one trick.
The cheesecake swirl can sink into the batter. Do not overmix the swirl. Spoon it gently on top and use a knife with just two or three motions.
A dry cake happens if you bake too long. Check at 30 minutes with a toothpick. If it comes out with a few crumbs, it is done. Ovens vary, so trust the toothpick.
I once forgot the vinegar in the batter. The cake was flat and dense. Vinegar helps the baking soda work. Do not skip it.
Why these fixes matter. Each one builds your confidence in the kitchen. You learn what each ingredient does. That makes you a better baker. Your cake will taste softer, richer, and more even. Which of these problems have you run into before?
Your Quick Questions
Can I use low-fat cream cheese for the swirl?
You can, but the swirl may not hold its shape as well. Full-fat cream cheese gives a rich, creamy texture that bakes smoothly. Low-fat cream cheese has more water, so it can make the swirl runny. If you want a firm swirl, stick with regular cream cheese. The powdered sugar helps stabilize it too. For best results, use the full-fat kind from the recipe. It makes the cake taste indulgent.
Why did my cake crack on top?
Cracks usually mean the oven is too hot or the batter overmixed. Red velvet batter needs a gentle hand. Overmixing develops gluten, which makes the cake tough and crack. Also check your oven temperature with a thermometer. If it runs hot, lower it by 25 degrees. The buttermilk and vinegar in the batter create a tender crumb. Taking care during mixing and baking avoids cracks and keeps the swirl pretty.
Can I leave out the red food coloring?
Yes, but the cake will be a deep brown color instead of red. The cocoa powder and buttermilk give a natural reddish tint, but it is very subtle. If you want the classic look, use the full bottle of red food coloring. You can swap it for beet powder or raspberry puree for a natural red. Just remember that changes the flavor slightly. The cake itself tastes the same without coloring. It is up to you. Which tip will you try first?
A Final Word From Lily
Thank you for baking along with me today. This cheesecake swirled red velvet cake is one of my favorites. It looks fancy but is simple to make.
I love hearing your stories. Did the frosting come out perfect? Did your family ask for seconds? Have you tried this recipe? Share your pictures and tips in the comments. I will be right here reading them.
Keep your oven warm and your heart full. Happy cooking!
—Lily Simmer

Cheesecake Swirled Red Velvet Cake
Description
This Cheesecake Swirled Red Velvet Cake is a rich and decadent dessert with a creamy cheesecake swirl and classic red velvet flavor.
Ingredients
For the Cake:
For the Cheesecake Swirl:
Instructions
- Grease and line two 9-inch round cake pans with parchment paper. Preheat your oven to 350°F (175°C) so it’s ready for baking.
- In a large mixing bowl, whisk together the all-purpose flour, granulated sugar, cocoa powder, baking soda, and salt until well combined.
- In a separate bowl, mix together the buttermilk, vegetable oil, eggs, white vinegar, vanilla extract, and red food coloring.
- Gradually pour the wet ingredients into the dry ingredients, mixing gently until everything is evenly combined.
- In a bowl, beat the cream cheese until creamy. Add in the powdered sugar and vanilla, mixing until light and fluffy.
- Divide the red velvet batter evenly between the pans. Spoon dollops of the cheesecake mixture over the batter and swirl gently.
- Place in the oven and bake for 30-35 minutes. Check for doneness with a toothpick.
- Once cooled, frost with remaining cheesecake mixture or cream cheese frosting.
Step 1: Prepare the Pans
Step 2: Mix Dry Ingredients
Step 3: Combine Wet Ingredients
Step 4: Combine Mixtures
Step 5: Make Cheesecake Mixture
Step 6: Assemble the Cake
Step 7: Bake the Cake
Step 8: Frost the Cake
Notes
- Bring cream cheese and eggs to room temp for smooth swirl. Do not overmix red velvet batter to keep tender crumb. Drop cheesecake filling in spoonfuls, then swirl with a knife only 3-4 times. Use gel food coloring for vibrant red. Bake at 325°F; check doneness with toothpick—moist crumbs are fine. Cool completely before frosting to prevent melting.