My Grandma’s Donut Secret
When I was a kid, Saturday morning meant one thing. My grandma would pull out her flour bin and that old cast-iron pot. She called these “sinkers” because they’d sit heavy in your tummy, but we loved them anyway.
The trick was always the buttermilk. She’d have a carton in the fridge just for baking. I still remember the tangy smell when she poured it in. Have you ever baked with buttermilk? If not, you’re missing a little bit of magic.
Why Buttermilk Makes Them Better
Buttermilk isn’t just for pancakes. It reacts with the baking soda to make the dough rise soft and tender. That’s why these donut bars have a light crumb, not a tough one.
Here’s a *fun fact*: real buttermilk used to be the liquid left after churning butter. Today we use cultured buttermilk, but it does the same job. That little bit of acid makes all the difference. Why does this matter? Because a tender donut is a happy donut. And happy donuts make happy mornings.
The Day I Dropped the Dough
I still laugh at the time I tried to rush the chilling step. I thought, “Two hours? Pfft.” So I rolled the dough right away. It stuck to the rolling pin, the counter, my hands, everything. The donuts came out lumpy and flat.
My grandma just shook her head and said, “Patience, Lily. The dough needs its nap.” She was right. Chilling the dough for at least two hours makes it easy to handle. Do you ever skip steps in a recipe? Tell me your kitchen shortcut or your biggest oops.
How to Fry Without Fear
Frying can feel scary, but it’s not. You just need a thermometer and a steady hand. Heat your oil to 350°F. Drop in three or four bars at a time. Give them about a minute per side until they’re golden brown.
Why does temperature matter? Too hot and the outside burns before the inside cooks. Too cool and they soak up oil like a sponge. I always test with a tiny scrap of dough first. If it bubbles and floats, you’re ready. Doesn’t that smell amazing? That nutmeg and fried dough scent fills the whole house.
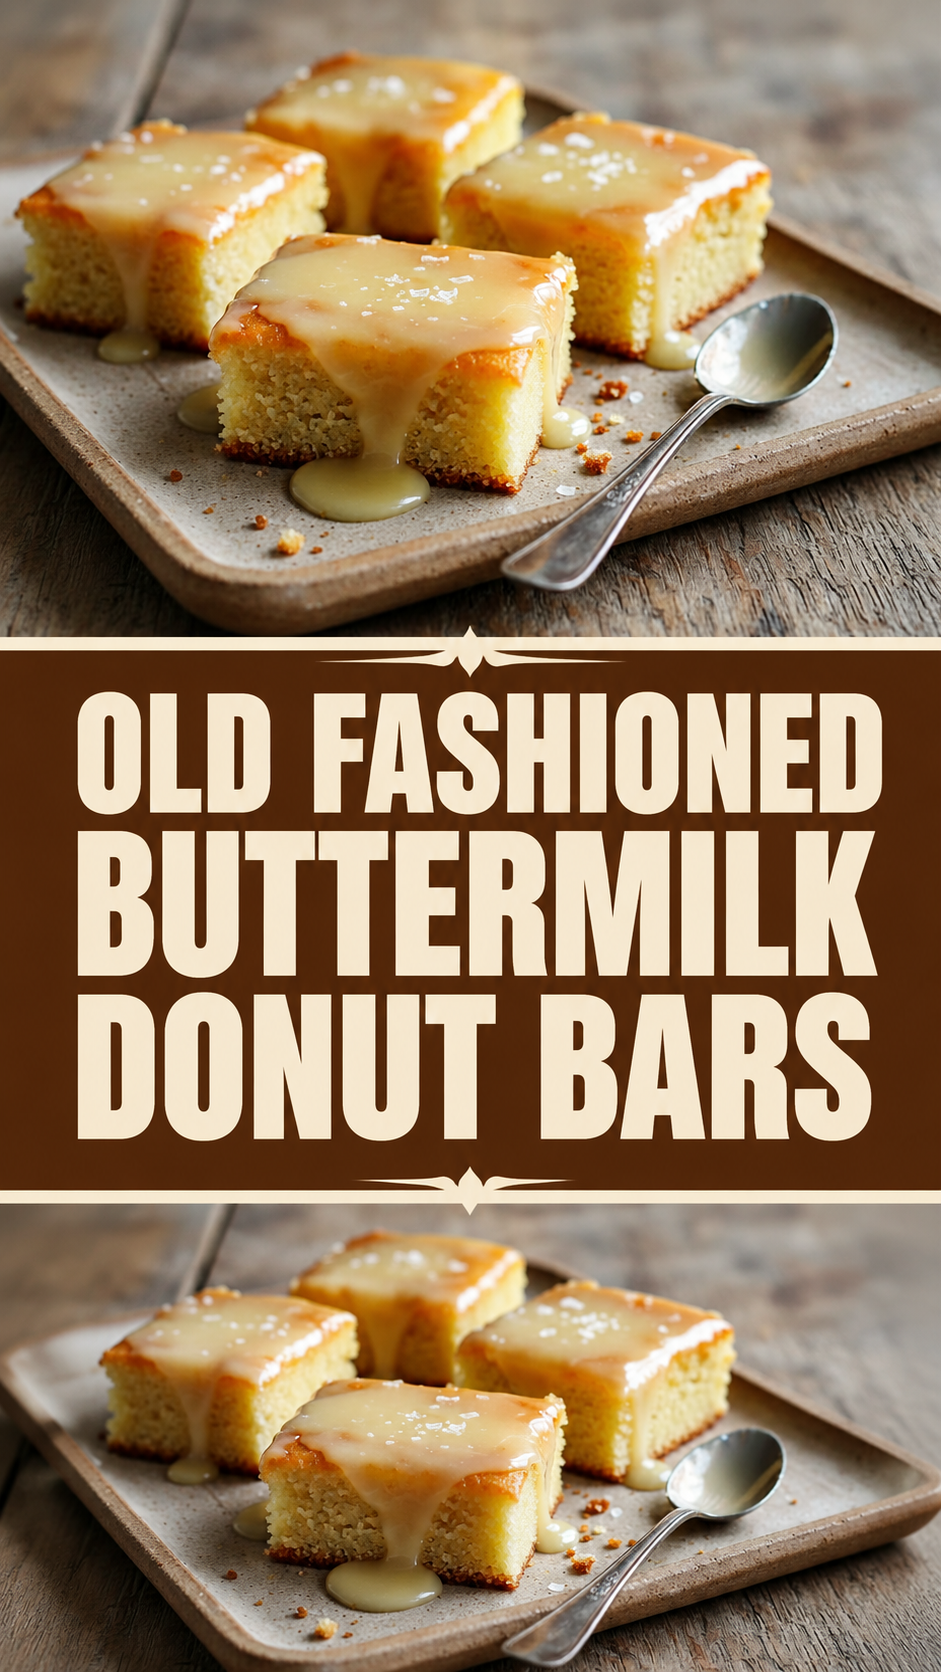
The Glaze That Makes Them Shine
The glaze is simple. Sifted confectioners’ sugar, a splash of milk or cream, vanilla, and a pinch of salt. Whisk until smooth. Then dip each warm donut bar and let the excess drip off.
Here’s a little tip: dip them while they’re still warm. The glaze sets into a thin, crackly shell. If you wait until they’re cold, it just sits on top and slides off. Why does this matter? Because that glossy coat is what makes a donut look like a donut. And looking good is half the fun.
Why Homemade Beats Store-Bought
I know it’s easier to grab a box at the grocery store. But these donut bars taste like a hug from your kitchen. You control the ingredients. No preservatives, no weird oils. Just butter, buttermilk, and love.
Besides, making them is a story you can tell. When you share a batch, you’re sharing that morning you spent rolling and frying. I’d love to know: who would you bake these for? A friend, a grandkid, or just yourself? Drop your answer in the comments or tell me next time you see me.

Instructions
Step 1: Whisk flour, baking powder, soda, salt, and nutmeg in a large bowl. Set it aside for now. (Hard‑learned tip: always whisk dry ingredients so the spice spreads evenly.)
Step 2: Cream softened butter and sugar until light and fluffy, about 3 minutes. Add eggs one at a time, then stir in vanilla. The mixture should look pale and smooth.
Step 3: On low speed, add the dry mix and buttermilk in turns, starting and ending with dry. Mix just until the flour disappears — overmixing makes tough bars. I still remember the first time I overmixed; my grandma shook her head.
Step 4: Turn the soft dough onto a floured surface and shape into a disc. Wrap it in plastic and chill for at least 2 hours. Cold dough is much easier to roll.
Step 5: Roll the dough to 1/2‑inch thick and cut into rectangular bars. Fry 3‑4 bars at a time in 350°F oil until golden on each side. Drain on a wire rack.
Step 6: Whisk confectioners’ sugar, milk, vanilla, and salt until smooth. Dip warm bars and let the glaze set for 15‑30 minutes. What is your favorite donut memory? Share below!
Creative Twists
… Sprinkle a pinch of cinnamon sugar over the glaze before it sets. It adds a cozy crunch.
… Swap the vanilla in the glaze for 1 teaspoon of lemon zest. Bright and tangy — great for spring.
… Fold 1/4 cup of mini chocolate chips into the dough before chilling. Melty chocolate surprises in every bite.
Which one would you try first? Comment below!
Serving & Pairing Ideas
Serve these bars with a tall glass of cold milk. The creamy drink balances the sweet, spiced glaze perfectly.
For a brunch spread, place them next to fresh berries and a bowl of whipped cream. Guests love dipping and stacking.
You can also warm them in the oven for 5 minutes and top with a scoop of vanilla ice cream. Dessert or breakfast — your call.
Which would you choose tonight?
Storing and Reheating Your Donut Bars
The first time I made these donut bars, I ate three right away. I was not sorry. But I learned you can save them for later.
Store cooled, unglazed donut bars in an airtight container at room temperature for two days. For the fridge, keep them in a sealed bag for up to a week.
Freeze them without glaze. Wrap each bar in plastic wrap, then place in a freezer bag. They keep for three months. Thaw at room temperature before glazing.
To reheat, pop them in a 350°F oven for five minutes. This brings back the crisp outside and soft inside. Never use the microwave—it makes them rubbery.
Batch cooking matters because you get fresh donuts anytime. Just fry extra, freeze them, and glaze when company comes. Have you ever tried storing it this way? Share below!
*Fun fact: Nutmeg is the secret that makes these taste like a bakery treat. Freshly grate it for the best flavor.
Three Common Donut Problems and Easy Fixes
Problem one: Your dough is too sticky. I once added too much buttermilk and got a goopy mess. Fix it by sprinkling in a little extra flour, one tablespoon at a time.
Problem two: The oil is too hot or too cold. If your donuts burn on the outside but stay raw inside, the oil is too hot. If they soak up grease, it is too cold. Use a thermometer to keep it at 350°F.
Problem three: Your glaze is too thin. This happened to me on a humid day. Just whisk in more sifted confectioners’ sugar until it coats the back of a spoon.
Fixing these problems builds your cooking confidence. You learn what the dough should feel like and how oil behaves. That makes every batch better.
Better flavor comes from getting it right. A golden crust and creamy glaze taste amazing. Which of these problems have you run into before?
Your Quick Questions
Can I bake these instead of frying?
Yes, you can bake them for a lighter version. Place the cut bars on a parchment-lined baking sheet. Brush them with melted butter. Bake at 375°F for 12 to 15 minutes until golden. They will be more cake-like than fried donuts. The texture changes, but the buttermilk and nutmeg flavor stays lovely. You miss the crispy fried crust, but you save on oil. This works best when you want a quicker, less messy treat for the kids.
Can I use a buttermilk substitute?
Absolutely. For one and a half cups of buttermilk, pour one and a half tablespoons of lemon juice or white vinegar into a measuring cup. Add enough whole milk to reach one and a half cups. Stir and let it sit for five minutes. It will look curdled, and that is perfect. This substitute works because the acid reacts with the baking soda to give you a tender donut. It will not change the taste much, so you can bake with confidence.
How do I keep donuts soft for the next day?
Store them in an airtight container with a slice of bread. The bread absorbs extra air and keeps the donuts moist. Replace the bread slice each day. Do not refrigerate glazed donuts, because the glaze gets sticky and wet. Room temperature is best for one to two days. If you want them to last longer, freeze them without glaze. Then warm them in the oven for five minutes before serving. This trick works for all fried dough treats.
Which tip will you try first?
One Last Bite from Lily Simmer
I hope these tips help you make the best donut bars. There is nothing like the smell of nutmeg and vanilla in your kitchen. It reminds me of Saturday mornings at my grandma’s house.
Cooking is about sharing joy with the people you love. When you fry up a batch, the whole house fills with warmth. I would love to hear how yours turn out.
Have you tried this recipe? Tell me about your donut adventure in the comments. Did you add a special topping?
Happy cooking!
—Lily Simmer

Old Fashioned Buttermilk Donut Bars
Description
Classic old-fashioned buttermilk donut bars with a sweet vanilla glaze. Light, tender, and perfectly fried.
Ingredients
For the Dough:
For Frying:
For the Glaze:
Instructions
- Step 1: Combine Dry Ingredients. In a large bowl, whisk together the all-purpose flour, baking powder, baking soda, salt, and freshly grated nutmeg. Set aside.
- Step 2: Cream Butter and Sugar. In a stand mixer, cream softened butter and granulated sugar on medium speed for 3-5 minutes until light, fluffy, and pale.
- Step 3: Incorporate Eggs and Vanilla. Add eggs one at a time, beating well after each addition. Scrape down the sides of the bowl. Stir in vanilla extract.
- Step 4: Alternate Wet and Dry Ingredients. On low speed, alternately add the dry ingredient mixture and buttermilk to the wet mixture. Start and end with dry ingredients. Mix just until flour streaks disappear; avoid overmixing. The dough will be soft and sticky.
- Step 5: Chill Dough. Turn dough onto a lightly floured surface and form it into a disc/rectangle. Wrap tightly in plastic wrap and refrigerate for at least 2 hours or overnight for better handling.
- Step 6: Roll Dough. Lightly flour your work surface, rolling pin, and hands. Roll the chilled dough into a large rectangle about ½ inch thick.
- Step 7: Cut Donut Bars. Using a sharp knife or pizza cutter, cut the dough into rectangular bars approximately 1 inch wide by 3-4 inches long. Place cut bars on lightly floured or parchment-lined baking sheets.
- Step 8: Set Up Frying Station. In a heavy-bottomed pot, pour enough vegetable oil or canola oil to reach about 3-4 inches deep. Attach a deep-fry thermometer and heat oil over medium-high heat until it reaches 350°F (175°C).
- Step 9: Fry Batches. Carefully lower 3-4 donut bars into hot oil using a slotted spoon; do not overcrowd. Fry for about 1-2 minutes on each side until golden brown.
- Step 10: Drain Fried Donut Bars. Remove cooked donut bars with a slotted spoon; let excess oil drip off. Transfer them to a wire rack set over paper towels to drain and cool slightly before glazing.
- Step 11: Whisk Glaze Ingredients. In a medium bowl, whisk together sifted confectioners’ sugar, whole milk/heavy cream, pure vanilla extract, and salt until smooth. Adjust consistency with additional milk or sugar as needed.
- Step 12: Dip and Set Glaze. Dip each warm donut bar into the glaze either coating one side or fully submerging it. Lift each bar allowing excess glaze to drip off before placing them back on the wire rack to set for about 15-30 minutes.
Prepare Dough
Shape and Cut
Fry Donut Bars
Prepare Glaze
Glaze and Finish
Notes
- Chill dough for 30 minutes before rolling to prevent sticking.
- Fry at 350°F in batches; don’t overcrowd. Use a candy thermometer for oil temp.
- Buttermilk adds tenderness; don’t overmix or dough becomes tough.
- Drain on paper towels. Glaze while warm for best coating.