My First Batch of Gooey Bars
The first time I made these bars, I was in a tiny apartment kitchen. My sink was full of dishes. I had no mixer and no patience. I still laugh at that.
My friend had handed me a sticky, crumbly square and said “try this.” One bite and I knew I had to learn how. No oven. No fuss. Just peanut butter, chocolate, and a little bit of love.
Why No-Bake Cooking Matters
Some days you just don’t want to turn on the oven. Maybe it’s hot outside. Maybe you’re short on time. These bars save the day.
*Fun fact: Graham crackers were invented over 150 years ago by a minister who thought plain food made people behave better. I think he’d smile seeing them turned into a dessert like this.
Doesn’t that make you want to crush up a few sheets and get started?
Building the Layers
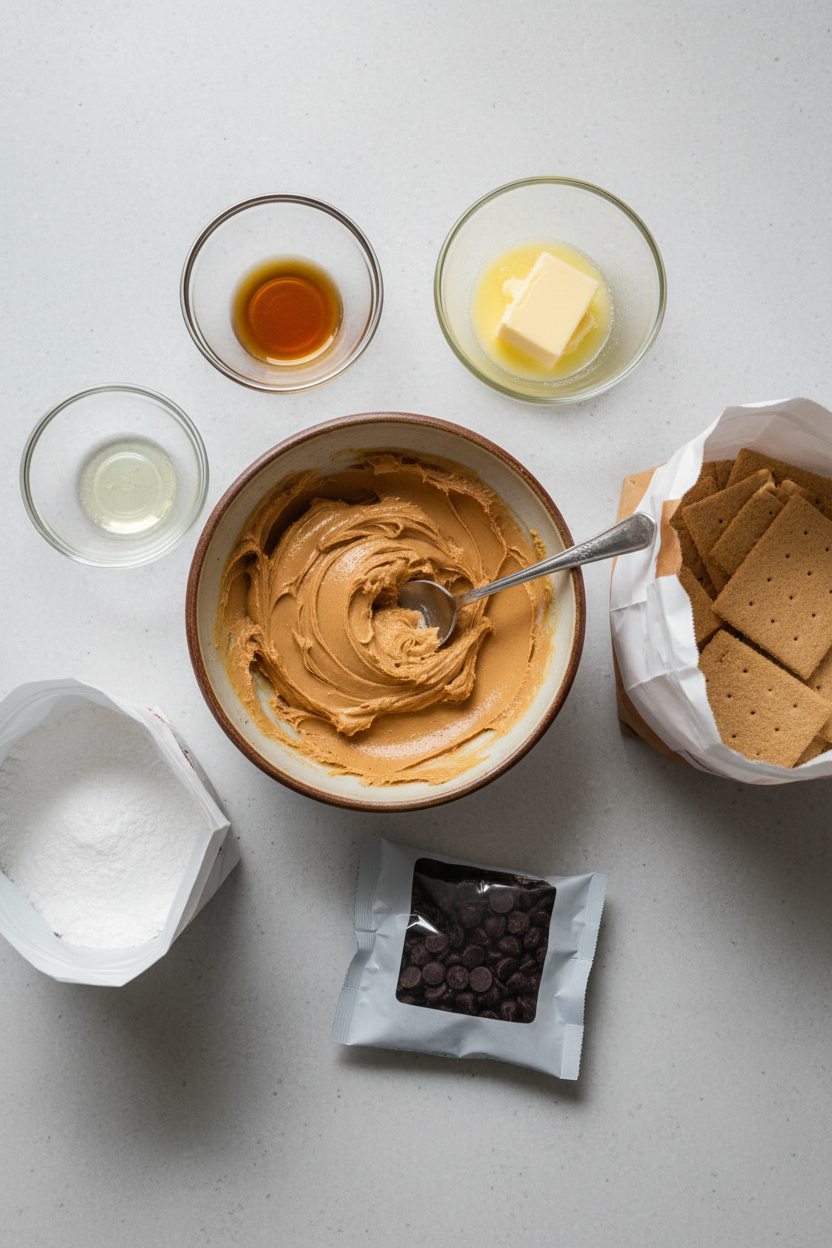
You start with a layer of whole graham crackers at the bottom of your pan. Then you pour on a thin layer of melted chocolate. I like to use a spatula and spread it gently. If you push too hard, the crackers break.
Next comes the peanut butter mixture. You take fistfuls of it and flatten them with your hands. Press them down piece by piece. Cover the chocolate the best you can. It doesn’t have to be perfect.
I remember making this with my granddaughter. She called the peanut butter lumps “mud pies.” We laughed every time one broke in her fingers.
The Secret to Smooth Chocolate
Melting chocolate chips can be tricky. You heat them in thirty-second bursts. Stir in between. But here’s the trick: add a little shortening or a splash of vegetable oil. It makes the chocolate melt evenly and stay smooth.
Why does this matter? If the chocolate is too thick, it won’t spread nicely. It might look streaky. And when you cut the bars later, the chocolate can crack. The shortening gives you clean, pretty squares.
Have you ever tried melting chocolate without oil and ended up with a clumpy mess? I sure have.
Waiting Is the Hardest Part
After you pour on the last layer of chocolate and sprinkle the graham cracker crumbs, you pop the pan in the fridge. At least one hour. But if you can wait longer, even better.
Here’s another why-this-matters: letting the bars sit at room temperature for ten or fifteen minutes before slicing makes cutting much easier. A sharp knife and a quick wipe between cuts gives you neat edges. Nobody likes a crumbly mess.
I always pull the pan out and tap my fingers while I wait. The smell of peanut butter and chocolate fills the whole kitchen. Doesn’t that smell amazing?
Share Your Own Kitchen Stories
These bars are perfect for bake sales, lunchboxes, or a quiet afternoon snack. They keep well in the fridge for a few days. I bet you could even freeze them.
Now I want to hear from you. What’s your favorite no-bake treat to make when you don’t want to turn on the oven? And would you add anything to these bars, like a sprinkle of sea salt or a handful of mini marshmallows?
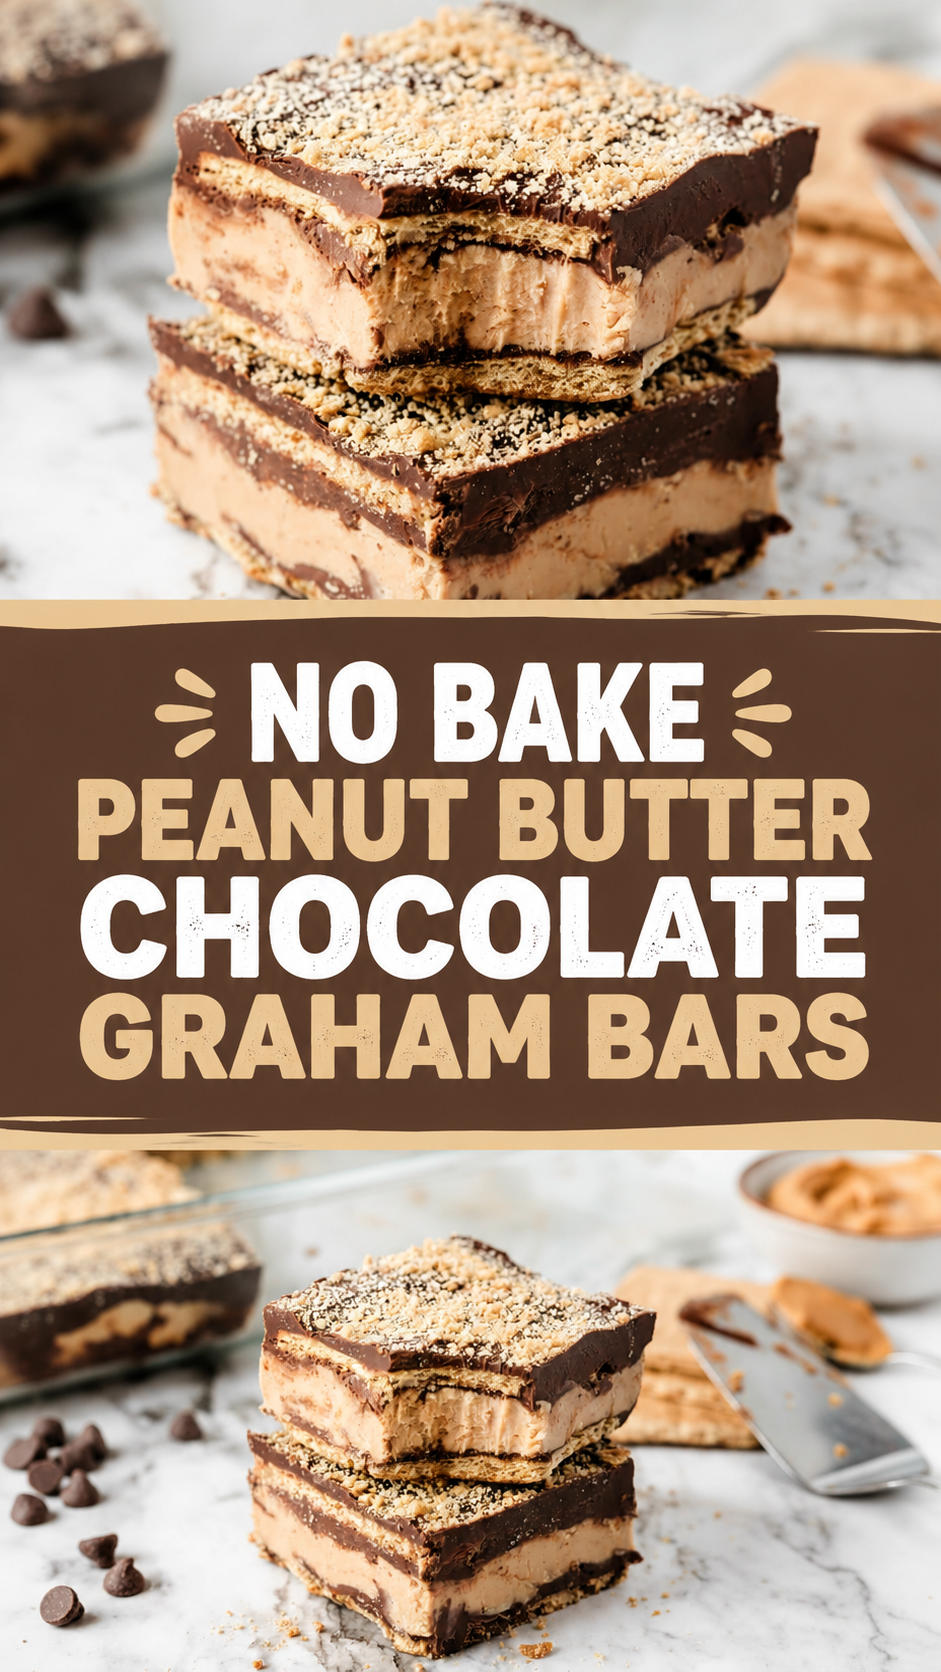
No Bake Peanut Butter Chocolate Graham Bars
Step 1: Crush two sheets of graham crackers into fine crumbs. I like to put them in a zippered bag and roll a can over them. You can also buy already-crushed crumbs at the store. (Hard-learned tip: Save a few bigger chunks for crunch — don’t overcrush!)
Step 2: Mix your peanut butter, butter, vanilla, and a pinch of salt in a bowl. Then add powdered sugar a little at a time. Stir until it feels like soft play dough. My grandma always said, “Taste it — does it need more salt?”
Step 3: Melt chocolate chips with a spoonful of shortening in the microwave. Heat for 30 seconds, stir, then repeat until smooth. Don’t rush this — burnt chocolate smells sad. What’s your favorite chocolate brand to bake with? Share below!
Step 4: Line your pan with foil or parchment and spray with non-stick oil. Lay six whole graham sheets flat on the bottom. Pour about one-third of the melted chocolate over them and spread it thin.
Step 5: Grab fistfuls of the peanut butter mixture and flatten into patties. Lay them on top of the chocolate layer, covering as much as you can without breaking the grahams. Use all the peanut butter — it is the best part!
Step 6: Pour another third of chocolate over the peanut butter, then place six more whole graham sheets on top. Pour the rest of the chocolate over everything and sprinkle the crushed crumbs. Chill for at least one hour, then let sit 10 minutes before slicing with a sharp knife. Wipe the blade clean between cuts for neat squares.
Creative Twists
… Swap peanut butter for sunflower seed butter — it tastes almost the same and is nut-free.
… Stir in a handful of mini marshmallows into the peanut butter layer for a s’mores surprise.
… Drizzle a little melted white chocolate on top for fancy zigzags. Which one would you try first? Comment below!
Serving & Pairing Ideas
Serve these bars with a tall glass of cold milk — it just feels right. For a dessert board, place them next to fresh strawberries and salted pretzels. You can also cut them into tiny squares and tuck them into lunchboxes as a happy surprise. Which would you choose tonight?
How to Store Your Peanut Butter Chocolate Bars
These bars are best kept in the fridge. They stay firm and taste even better cold. I once forgot them on the counter overnight. They got a little soft, but we ate them anyway. Now I always pop them in the fridge right after they set.
You can also freeze them. Wrap each bar in wax paper, then place in a freezer bag. They keep for up to three months. Just let them thaw in the fridge before eating. This is great for batch cooking. Make a double batch on a lazy Sunday, and you have treats for weeks.
To reheat, let the bars sit at room temperature for ten minutes. Or warm a single bar in the microwave for ten seconds. That softens the chocolate just a little. Why does batch cooking matter? It saves you time later. You always have a homemade dessert ready. *Fun fact: Did you know you can freeze these bars for up to three months?*
Have you ever tried storing it this way? Share below!
Three Common Problems (and Easy Fixes)
Problem one: The bars crumble when you cut them. I first made these for a school bake sale. My knife got stuck, and the bars fell apart. The fix is simple. Let them sit at room temperature for ten to fifteen minutes before slicing. Use a sharp knife and wipe it between cuts.
Problem two: The chocolate layer is too thick or lumps. I remember melting chocolate chips without shortening once. They seized up and turned grainy. The fix is to always add a little shortening or vegetable oil. It makes the chocolate smooth and easy to spread.
Problem three: The peanut butter mixture is too sticky to handle. If you can’t flatten it with your hands, try wetting your fingers slightly. Or press it between two pieces of wax paper. These fixes help you feel more confident in the kitchen. And when you fix a problem, the bars taste much better. Which of these problems have you run into before?
Your Quick Questions
Can I use crunchy peanut butter instead of creamy?
Yes, you can. Crunchy peanut butter will add little bits of peanut to the mixture. That gives the bars a nice texture. Just know that the layer won’t be as smooth when you flatten it. The graham crackers still stick fine. The taste is still delicious. Many home cooks love the crunch. Try it once and see if you like it better. The recipe works either way. Which tip will you try first?
What if I don’t have shortening? Can I skip it?
Do not skip the shortening or oil. It helps the chocolate melt evenly and makes cutting clean. If you have no shortening, use vegetable oil instead. Use the same amount. Melt the chocolate chips in the microwave in thirty-second bursts. Stir each time until smooth. Without any fat, the chocolate can get thick and clumpy. That makes the bars harder to cut. So always add a little oil or shortening for the best result.
How long do these bars stay fresh in the fridge?
They stay fresh for up to one week in the fridge. Keep them in an airtight container. The graham crackers stay crisp, and the peanut butter stays soft. After a week, the bars may start to dry out. If you want them to last longer, freeze them. Wrap each bar tightly in plastic wrap, then put them in a freezer bag. They taste just as good after thawing. That is a great way to have treats ready for guests.
A Warm Send-Off from Lily Simmer
I hope you love making these no-bake bars as much as I do. They are perfect for a quick snack or a sweet gift. Share your stories in the comments. I always smile when I hear from you. Have you tried this recipe? Tell me how it turned out.
Happy cooking!
—Lily Simmer

No Bake Peanut Butter Chocolate Graham Bars
Description
These no-bake bars are a delicious combination of peanut butter, chocolate, and graham crackers.
Ingredients
Instructions
- Crush 2 sheets of graham crackers until they are crumbs. Pro-tip: You can put them in a ziplock bag to crush them using a rolling pin or the smooth side of a meat mallet. You can also buy them already in crumbs.
- Mix peanut butter, butter, vanilla, and salt. Slowly add in powdered sugar a little at a time.
- In a microwave safe bowl, heat the chocolate chips with shortening. Heat for 30 seconds at a time, stirring in between, until smooth. Be careful not to overcook. Pro-tip: Don’t leave out the shortening when you’re melting your chocolate chips. Not only does it help the chocolate chips to melt more evenly, but it’ll make cutting your final product much smoother! If you don’t have shortening on hand, you could also use vegetable oil.
- Lay the first layer of graham crackers (6 whole sheets) in your prepared dish. Pro-tip: I have found that it can be easier to cut your Peanut Butter bars if you line your pan with foil or parchment paper and then use a non-stick spray.
- Pour about 1/3 of the chocolate into a thin layer over the graham crackers.
- Using your hands, take fistfuls of the peanut butter mixture and flatten. Lay on top of the chocolate layer. Cover as best you can without breaking the graham crackers below. You will use all of the peanut butter mixture.
- Layer another 1/3 of chocolate on top of the peanut butter and then layer again with graham crackers (6 whole sheets).
- Pour the remaining chocolate on top. Sprinkle the crushed graham cracker crumbs on top.
- Let cool in the refrigerator for at least 1 hour. Cut into squares, big or small, and serve. For best cutting results, let the bars sit at room temperature for about 10 to 15 minutes before slicing. Use a sharp knife and wipe it between cuts.
Step 1: Prepare the Crust and Peanut Butter Mixture
Step 2: Melt the Chocolate
Step 3: Assemble the Bars
Step 4: Chill and Serve
Notes
- Use creamy peanut butter for smooth texture.
- Line pan with parchment for easy removal.
- Press graham crust firmly.
- Chill at least 2 hours before adding chocolate layer.
- For clean cuts, let bars sit at room temp 5 minutes then slice with a hot knife.
- Store in fridge.