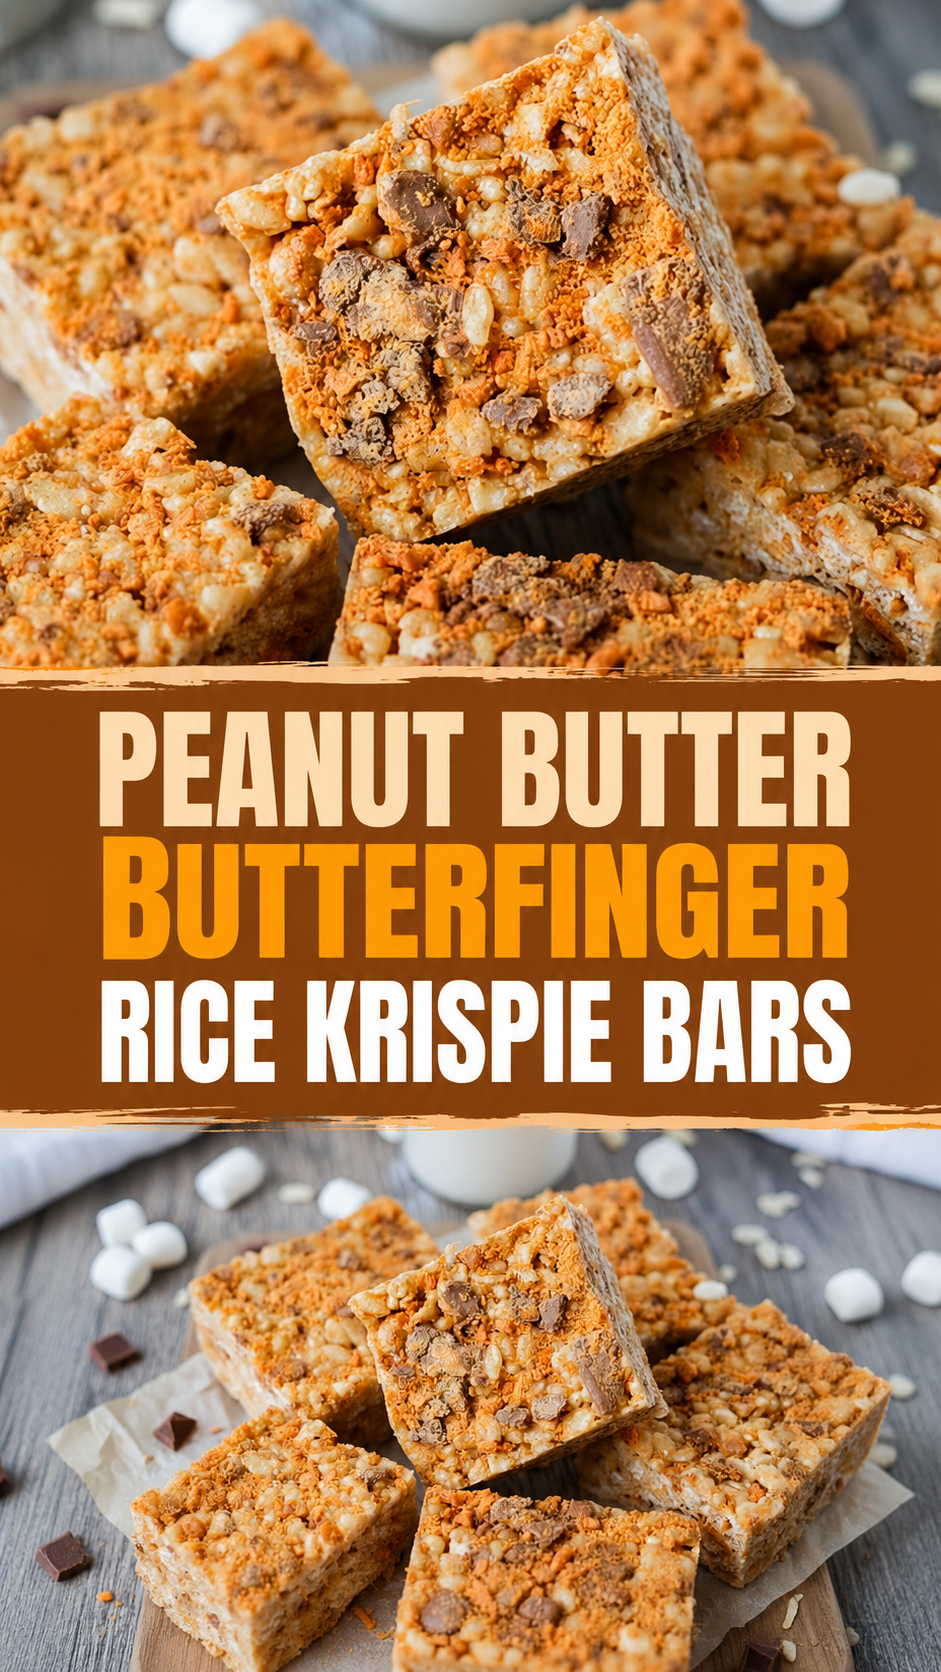
My First Batch of Crunchy Peanut Butter Bars
I still remember the first time I made these. My grandson, Leo, wanted a treat for his school bake sale. He loved Butterfingers, and I had a big box of Rice Krispies in the pantry. So we crushed the candy bars with a rolling pin on the kitchen floor. He laughed every time a piece flew across the room. Doesn’t that sound like a good memory? I still laugh at that.
These bars are not your usual rice krispie treats. They have peanut butter and crunchy candy bits inside. The smell while they cool is amazing. I bet your kitchen would smell just as good.
Why These Bars Matter More Than You Think
This recipe is about sharing something simple with people you care about. You do not need fancy tools or store-bought mixes. Just a pot, a spoon, and a little patience. When you make these, you are making a memory. That is why this matters — food brings us together.
Another reason: they are forgiving. If you add too many marshmallows or not enough cereal, they still taste wonderful. You can even swap the candy for something else. Have you ever tried making rice krispie treats with a different candy bar? Tell me in your heart — I am curious.
The Secret to Easy Crushing
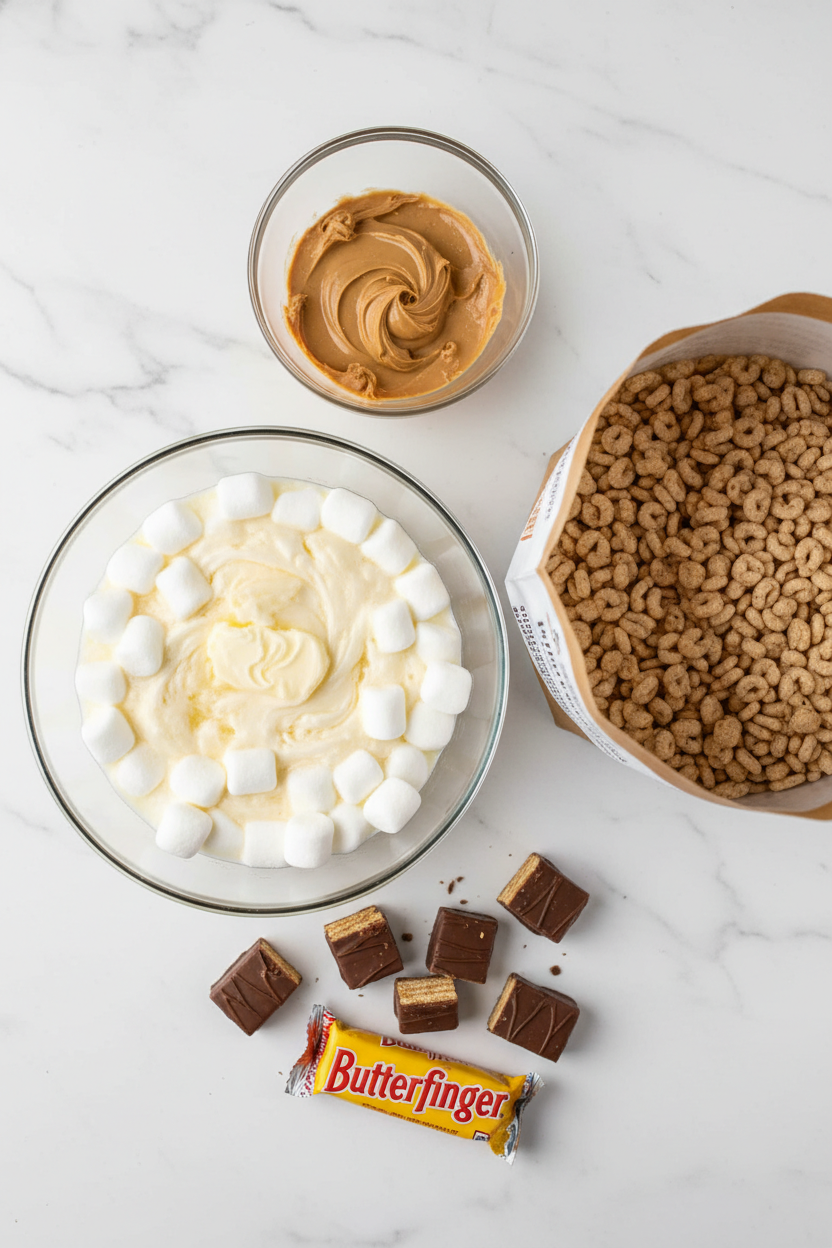
Put the Butterfingers in a strong plastic bag. Use a heavy rolling pin or even a small mallet. You want some big chunks and some fine crumbs. That way every bite has a surprise. My tip: fold the bag over a few times so it does not burst open. Trust me, I learned the hard way.
*Fun fact:* Butterfinger candy bars were created in 1923. The name came from a contest — someone thought the bar looked like a buttery finger. I always smile when I think about that. Does not that name make you hungry?
A Little Lesson in Melting
Melt the butter and marshmallows slowly over medium heat. Keep stirring so nothing burns. Then take the pot off the stove before you add the peanut butter. This keeps the peanut butter smooth. If you stir too fast, it might splatter. I always whisper “slow and steady” to myself.
Why does this matter? Because melted marshmallows are sticky and hot. You do not want a burn. Plus, if you add the peanut butter while the pot is still on the heat, it can separate and get oily. We want creamy, gooey bars, not greasy ones.
The Mixing Dance
After the peanut butter is all melted, dump in the crushed Butterfingers. Stir until they disappear into the pinkish mixture. Then fold in the Rice Krispies. Use a gentle folding motion, like you are tucking a baby into bed. That way the cereal stays crunchy.
I always let my grandkids help with this part. They love seeing the white marshmallows turn into a brown, glossy mess. Have you ever made treats with a little helper in your kitchen? I would love to hear your story someday.
Spreading and Waiting
Spread the mixture into a greased 9×13 pan. Use a rubber spatula that you also sprayed with cooking spray. This keeps the sticky stuff from clinging. Pat it down gently, but do not smash it flat. You want soft squares, not rocks.
Let them cool for a whole hour before cutting. I know that is hard to wait. But if you cut too soon, they fall apart. That is why patience matters here. While they cool, you can lick the spatula — that is my secret reward. Does not that sound fair?
Your Turn to Make a Memory
Now you have the recipe and a few stories. I hope you try these peanut butter Butterfinger rice krispie bars for someone you love. Maybe for a birthday, a rainy day, or just because. They take only a few minutes to make, and they disappear even faster.
Here is one last question: What is your favorite childhood dessert that still makes you smile? I bet it has something crunchy or chocolatey. Share that thought with someone today. And if you make these bars, think of me — I will be smiling right along with you.
Instructions
Step 1: Grease a 9×13 pan with cooking spray. This keeps the bars from sticking. Now grab your Butterfingers. Put them in a plastic bag and crush them with a rolling pin. (I once used a heavy book—worked just fine!) Leave some bigger chunks for crunch.
Step 2: In a large pot, melt the butter over medium heat. Add the marshmallows and stir until smooth. The smell will remind you of campfire s’mores. Does that ever make you hungry? Share below!
Step 3: Take the pot off the heat. Stir in the peanut butter until it melts completely. Mix quickly so it stays creamy. A wooden spoon works best here.
Step 4: Fold in your crushed Butterfingers. Make sure every piece gets coated. My grandson loves picking out the candy bits.
Step 5: Add the Rice Krispies cereal. Stir gently until every puff is covered. Be careful not to crush the cereal. We want them to stay crispy.
Step 6: Pour the mixture into the prepared pan. Grease a spatula to spread it evenly. Press down lightly. Let them cool for an hour before cutting. If you cut too soon, they fall apart.
Creative Twists
… Swap peanut butter for Nutella for a hazelnut twist.
… Sprinkle mini chocolate chips on top before they set.
… Use crushed pretzels instead of Butterfingers for salty crunch.
Which one would you try first? Comment below!
Serving & Pairing Ideas
Pour yourself a tall glass of cold milk. It cuts the sweetness just right. You can also serve these bars with a scoop of vanilla ice cream. For a fruity twist, add sliced bananas on the side. They make a great after-school treat or party dessert. Which would you choose tonight?
Storing and Reheating Your Bars
These bars are perfect for making ahead. I remember my first time storing them. I put them in the fridge uncovered and they got sticky. Now I know better. Let them cool completely, then cut into squares. Stack them in an airtight container with wax paper between layers. They stay fresh on the counter for up to three days. You can also freeze them for up to two months. Just wrap each bar in plastic wrap, then pop them in a freezer bag. When you want a treat, let them thaw at room temperature for 10 minutes. Reheating is easy. Place one bar on a plate and microwave for 10 seconds. The peanut butter gets soft and gooey again. Batch cooking is a lifesaver for parties or school treats. Make a double batch and freeze half. That way you always have something special ready. *Fun fact: Rice Krispies were invented in 1928 by accident when a batch of rice got too crispy.* Have you ever tried storing it this way? Share below!
Three Common Problems and Easy Fixes
Sometimes the bars turn out too hard. That happens if you overheat the marshmallows. I once burnt a whole pot. The fix is simple. Melt them on medium heat and stir constantly. Remove from heat as soon as they are smooth. Another problem is sticky mess on your hands. Use a greased spatula to press the mixture into the pan. Spray your fingers with cooking spray before shaping. A third issue is crumbly bars that fall apart. This means you didn’t mix the cereal well enough. Fold gently until every piece is coated. Why does this matter? Getting the texture right makes you feel proud. You’ll want to share your bars with everyone. Good texture also means every bite has that perfect crunch and chew. Which of these problems have you run into before?
Your Quick Questions
Can I use chunky peanut butter instead of creamy?
Yes, you can. Chunky peanut butter adds little bits of peanut for extra crunch. It works the same way. Just stir it in thoroughly after melting the marshmallows. The texture will be a little different, but still delicious. Some folks love the surprise of a peanut piece. If you want a smoother bar, stick with creamy. Try it both ways and see which you like best. *Which tip will you try first?*
How do I keep the bars from sticking to the pan?
Spray your 9 by 13-inch pan well with cooking spray. You can also line it with parchment paper, leaving some overhang. That makes lifting the whole block easy. Grease the spatula too. When you press the mixture down, nothing sticks. If you forget, run a knife along the edges while the bars are still slightly warm. That helps loosen them. Sticking is a common worry, but this trick solves it every time.
Can I add other mix-ins like chocolate chips?
Absolutely. You can stir in half a cup of mini chocolate chips after the peanut butter is mixed in. They will melt a little and create chocolate ribbons. Or add chopped peanuts for more crunch. Just keep the total amount of add-ins around one cup. Too much can make the bars fall apart. Experiment with your favorite candy. I once added crushed pretzels for a salty twist. It was a hit. **Which tip will you try first?**
A Warm Goodbye from Lily Simmer
I hope you love making these Peanut Butter Butterfinger Rice Krispie Bars. They are so fun to share with family and friends. Every time I make them, someone asks for the recipe. The best part is seeing their happy faces after that first bite. I would love to hear how yours turn out. Have you tried this recipe? Tell me about your batch in the comments below. Maybe you added your own special twist. I can’t wait to read your stories. Happy cooking! –Lily Simmer.

Peanut Butter Butterfinger Rice Krispie Bars
Description
Crunchy, sweet, and packed with peanut butter and Butterfinger pieces.
Ingredients
Instructions
- Spray a 9×13-inch baking dish with cooking spray.
- Place Butterfingers into a plastic bag and crush with a rolling pin or mallet. They do not have to be completely crushed and can have larger pieces.
- In a large non-stick pot over medium heat, melt the butter.
- Add marshmallows and stir until melted.
- Remove from heat and add the peanut butter, stirring constantly until it has melted and is thoroughly mixed.
- Mix in crushed Butterfingers.
- Add Rice Krispies and mix completely.
- Pour contents into the prepared pan and spread evenly with a greased rubber spatula.
- Allow bars to cool completely before cutting, about an hour.
Step 1: Prepare the pan and crush Butterfingers
Step 2: Melt butter and marshmallows
Step 3: Add peanut butter and Butterfingers
Step 4: Add Rice Krispies and mix
Step 5: Pour and spread
Step 6: Cool and cut
Notes
- Use high-quality peanut butter for best flavor.
- Chop Butterfingers into small, even pieces to distribute easily.
- Melt marshmallows and butter on low heat to avoid burning. Stir constantly.
- Add cereal and peanut butter, then fold in candy.
- Press into buttered pan with greased spatula to prevent sticking.
- Cool completely before cutting for clean squares.
- Store in airtight container.